
How to Make a Poof with Woodland Ruffle Farmhouse Bunny Black and White Plaid Wreath
Hey everyone Lori here. How are you all doing today? I thought it would be a good idea to share with you a project that was one of my best selling items this year with the Farmhouse color pallet.


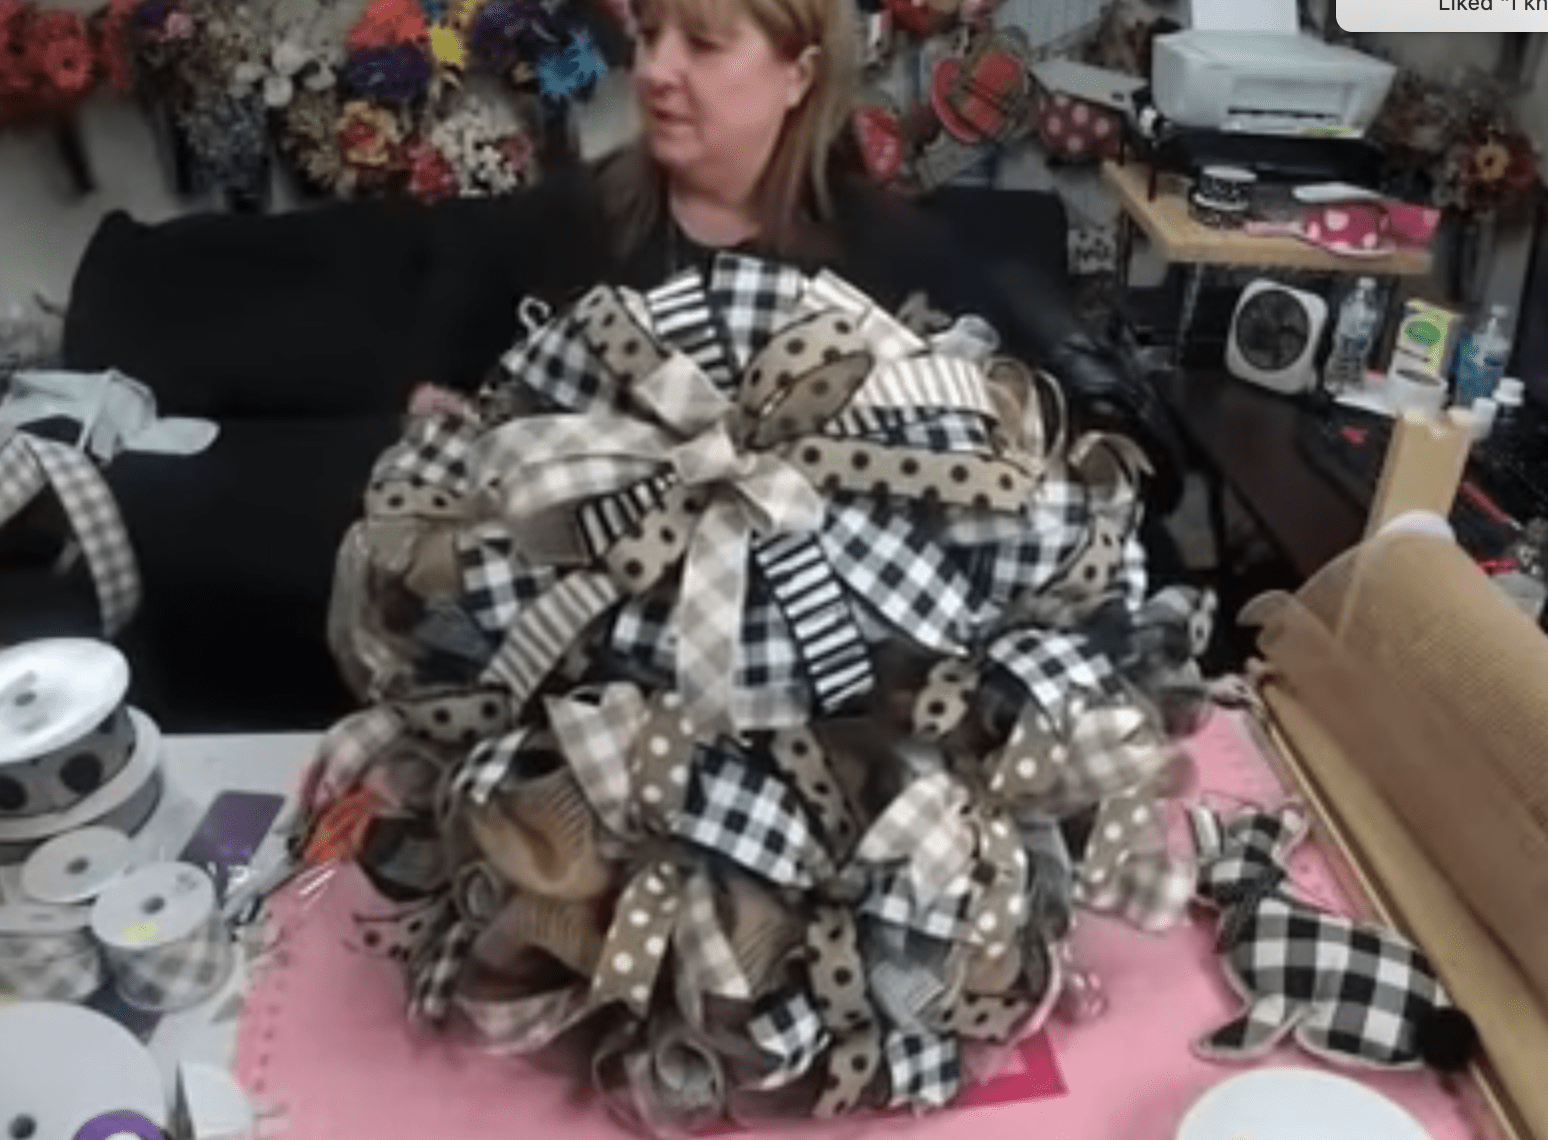
I found this cute bunny at Carolina Pottery and I just had to snag it. On this project, I wanted to mix it up and do poofs and then add the woodland ruffle around the poofs with this black and white plaid mesh.
Let’s get started I cut all my black and white mesh that was 10inch mesh by 10 yards and I cut it 20″ inch long. I will use the whole roll of the 10-yard mesh.


(Hard Working Mom Tip: If you are going to accent pieces with mesh if you have 10 yards mesh you will get exactly 18 pieces if you cut them at 20 inches which is what you need for a 15″ work-frame. You can get 36 inches of 10-inch pieces and with 30″ inch pieces, you can get 12. This is great because then you know how much mesh you will need for each project per cut of accent mesh)
My frame is a 15″ work-frame. I like to start at the bottom of the wreath you can start really where ever you would like. I am going to open all my ties up. I am going to take a zip tie and attach the clean edge of the mesh to the frame and tie it down right before one of the ties. This helps it blend in and you can’t tell where you started or stopped.


I am going to start my poofs I am going to use my perfect tailboard and measure out to 12″ and then place it into the frame. When you are placing the poof you want to keep the ends tucked under and this will help with not having the fraying ends. I like to hold them underneath and then pull it up and create that poof. We will do this around the wreath when going to the next layer of the frame and continue the poofs. When you have finished you will want to tie the mesh to the back of the wreath with a zip tie you don’t want the mesh to stick out but you want to hide it.


Moving on to the Woodland Ruffle you will roll the ends of the 10″ inch mesh and do one, two, three, rolls then ruffle the rest. If you have trouble with this you can use chip clips to help you hold one side while you work. Make sure you are tucking those ends well so that mesh won’t fray on you. Then we will place right on top of all of our poofs. I do not open my ties, I just place it right on top. We will go all the way around the wreath frame.
( Hard Working Mom Tip: if you are short one piece of mesh just add a bow in that spot)


Adding the ribbon tails. I am obsessed with this ribbon combo we have come up with. I am going to take my 2.5-inch ribbon and add my 1.5 inch on top and then fold them together meeting the ends and creating that crease, then I will pinch towards the middle and create that nice bird-like shape with the ribbon. Taking those ends and really making that fluff with them makes a difference when you place it into the wreath.


I will just add them right on top of the ties again not opening them just placing.
I really love doing these nontraditional patterns and colors for holidays it makes the project stand out and shows your creative side with the design. I wanted to make a bow to add to this wreath look how full it is already!

When making this bow I choose my EZ Bow Maker I love this bow maker it really is EZ to use ( See what I did there?). Before placing the ribbon and make sure you give those pegs a good hammer down so they do not open to much on you when you are using thicker ribbon. We are going to add the same ribbons we did in the wreath and then a couple of other patterns.


I am going to dovetail my ends we are going to do 8″ inch tails I am going to take it and pinch it and then twist and come out to the 7″ bringing it back to the bow maker and creating that loop and then going back again and ugly side of the ribbon up going back into the middle and then going a little shorter on this loop and repeating the steps. Cutting my tails at the 8″ inch. Next, I will take my black and white ribbon that is 2.5 inch and I will go shorter again with the loops and tails.


6.5″ inch is what we want to do on this one so I am going to twist this into my bow maker then going to make sure the ugly side is up and place it into my bow maker and making the loop and going back into the middle of the bow maker and then twist and going to the other side.


I am not worried about the placement of my ribbon right now I will be able to adjust this after we get the bow off the bowmaker. I will continue making the bow adding other ribbon choices. When I get done with the last ribbon I will add a center loop. When I feel like my bow is big enough I will take a zip tie and slip it under the ribbons as close to the center as I can not making it to tight. I will start to fluff from the bottom and moving my loops and tails where I would like them to go.


Once it is in place I will take some wire cut around 16″ inches or so and I will run it through the back of the zip tie then I will tighten it really good. I will place this on the wreath.
( Hard Working Mom Tip if you want your bow to stand out tie it on top of the poof, not onto the ties. This helps it stand up better and not be squashed. Do tie it to the frame.)
Then after I have it attached I will fluff the bow back out. Take your tails and pull down and give them a good bend with the fingers. GOSH, I love this bow!

The last step is to attach our cute bunny sign. The material is easy to work with so I will slip my 22 gauge wire in 3 different spots so that way this bunny will not go anywhere. Attaching it to the frame as well. The same rule would apply if you want the bunny to stand out make sure you place it on top of the poofs. Give yourself enough slack with the wire so you are not pulling it down to much and flatting out the poof.


SHAKE TEST! We have a juice bow and our cute bunny. I love this so much the colors and patterns all work together this would be great for Easter and spring decor. If you like this project make sure you check out others on YouTube. Want to make something like this listed bellow is the shopping list for you please check out TrendyTree and Deco Exchange for materials.
Supply List:
Supplies Trendy Tree- https://bit.ly/350JHZO
Deco Exchange https://goo.gl/QPsTPY
Woodland Ruffles 20″
Ribbons cut 12
Mesh for poofs 12″
Bunny Carolina Pottery
Supplies Trendy Tree- https://bit.ly/350JHZO
15 in Burlap work Wreath
1 21in Burlap Jute Mesh
1 10in Black and White Fabric Mesh
Ribbon Supplies Trendy Tree- https://bit.ly/350JHZO
Deco Exchange https://goo.gl/QPsTPY
1.5 in Tan with black dots ribbon
2.5 in Black and White Checked ribbon
2.5 in White and Tan Striped Ribbon
1.5 in Tan with White dots ribbon
Supplies Trendy Tree- https://bit.ly/350JHZO
Mesh Roller https://www.simplify-organize.com/pro…
Probow the hand http://amzn.to/2zbz4Yp
Fiskars Rotary cutter and mat http://amzn.to/2hyAUHL
Ryobi Glue gun http://amzn.to/2hBoizL
Bowdabra bow maker http://amzn.to/2zdPxeE
Metal Hole Punch http://amzn.to/2Ao
Affiliate links for tools used. If you purchase I will get a few pennies for the purchase. About enough to buy a stick of gum 🙂

https://hardworkingmom-school.thinkific.com/courses/youtube-success-in-six
Need Help?
If you are interested in learning more about our Success Path group, you are welcome to do so following this link: https://hardworkingmom.com/success-path
Want to learn Wreath Designing? Here is my Coaching Group, follow the link here: https://hardworkingmom.com/product/design-with-hard-working-mom-wreath-therapy-on-steroids/
Need a bundle, here is the link to save on both groups: https://hardworkingmom.com/product/design-with-hard-working-mom-wreath-therapy-on-steroids-combined-with-lori-jacobs-success-path/
Find Me Here
Email me: [email protected]
YouTube: @https://www.youtube.com/hardworkingmom
Instagram: @hardworkinglori
Twitter: @hardworkingmomtv
Facebook: @hardworkingmomtv
My Etsy Shop: DesignedByHWM
Hardworkingmom Store: https://hardworkingmomstore.com/
Amazon Influencer: https://www.amazon.com/shop/influencer-5ef69f14
