
DIY Candy Ornaments for a Christmas Tree: Sweet and Simple Holiday Decor
DIY Candy Ornaments for a Christmas Tree
Nothing says Christmas like a festive tree filled with candy-themed ornaments! These peppermint-inspired decorations are not only adorable, but they’re also quick, affordable, and easy to make. Whether your holiday theme is red-and-white candy cane, whimsical pastel, or full-on gingerbread wonderland, this project can be customized to match your style.
In this tutorial, you’ll learn how to create large peppermint candies, candy canes, and swirled candy sticks that will make your Christmas tree look like it came straight out of Santa’s workshop.
Supplies You’ll Need
For Peppermint Candy Ornaments:
- Pool noodles (Dollar Tree works great)
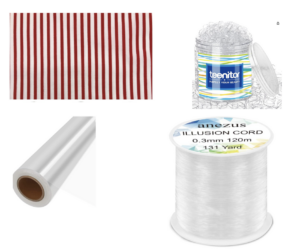
- Fabric in your chosen color or pattern (red-and-white stripes are classic) – cut to 8″ x 10″ for 5″ pool noodle pieces
- Mylar wrapping (basket wrap or cellophane sheets) – cut to 8″ x 12″
- Small clear rubber bands
- Scissors
- Optional: curling ribbon, bows, or embellishments
- Optional: fishing line for hanging ornaments
- Low-temperature hot glue gun & glue sticks
For Fabric-Wrapped Candy Canes:
- Plastic hair rollers or floral wire (18 gauge)
- Fabric strips
- Thin batting (optional, for padding)
- Hot glue gun & glue sticks
- Scissors
For Ribbon Candy Sticks:
- Wired ribbon (at least 1.5″ wide)
- Two pieces of floral wire (18 gauge)
- Decorative trim (optional)
- Hot glue gun & glue sticks
- Dowel rod (for twisting)
For Yarn Twist Candies:
- Two colors of yarn (red and white work perfectly)
- Hot glue gun & glue sticks
- Scissors
Instructions
1. Peppermint Candy Ornaments
- Cut the Pool Noodle
- Slice your pool noodle into 5″ sections (adjust size depending on your tree).
- Keep cuts as straight as possible so the “candy” sits nicely in the wrapper.
- Wrap with Fabric
- Cut fabric into 8″ x 10″ rectangles.
- Place the pool noodle piece in the center and roll the fabric tightly around it.
- Tuck the excess fabric into each end of the noodle using your finger or the tip of your scissors.
- Wrap in Cellophane
- Cut sheets into 8″ x 12″ rectangles.
- Center the fabric-wrapped noodle and roll the cellophane tightly around it.
- Twist each end and secure with small clear rubber bands.
- Add Embellishments (Optional)
- Tie curling ribbon or bows over the rubber bands for a festive touch.
- Add a Hanger (Optional)
- Use fishing line and a small dab of hot glue to create a loop for hanging.
2. Fabric-Wrapped Candy Canes
- Prepare the Base
- Use a plastic hair roller or shape floral wire into a candy cane curve.
- For extra fullness, wrap the wire with thin batting.
- Wrap with Fabric
- Cut fabric strips wide enough to wrap around the cane (about 2–3″ wide).
- Secure one end with hot glue and roll the fabric tightly, gluing as you go.
- Finish the Ends
- Tuck or glue down the ends neatly.
- Add a ribbon bow if desired.
3. Ribbon Candy Sticks
- Cut and Prepare Ribbon
- Cut wired ribbon into 24″ lengths.
- Place one floral wire along each edge of the ribbon and secure with hot glue.
- Add Decorative Trim (Optional)
- Glue pom-pom trim or lace along the edges for extra flair.
- Shape the Stick
- Place the wired ribbon around a dowel rod and twist to create a swirl effect.
- Remove from the dowel and trim ends neatly.
4. Yarn Twist Candies
- Choose Your Colors
- Select two colors of yarn (red and white for a peppermint look).
- Twist the Yarn
- Glue the yarn ends together.
- Hold both strands and twist them together, adding a dab of glue every few inches.
- Finish
- Trim the ends and glue them neatly.
- Shape into straight sticks, circles, or candy canes.
Tips & Ideas for Customization
- Theme Matching – Change fabric and ribbon colors to match your tree’s theme (pastel for whimsical, gold and cream for elegant, bright colors for playful).
- Mix Sizes – Make some candies large to fill space on a big tree, and some smaller for filler ornaments.
- Add Glitter – Brush fabric edges lightly with Mod Podge and sprinkle fine glitter for a sparkle effect.
- Wreath Decor – Use the same candy ornaments as accents in Christmas wreaths and garlands.
Why You’ll Love This Project
These candy ornaments are:
- Budget-Friendly – Most supplies come from the dollar store or craft store clearance.
- Beginner-Friendly – No special crafting skills required.
- Fast – You can make a dozen in under an hour.
- Versatile – Works for trees, wreaths, table centerpieces, and more.
Decorating your Christmas tree with these sweet ornaments will make it look magical, and because they’re handmade, they’ll also hold special meaning year after year. Plus, crafting them can be a fun family activity, just be ready for everyone to claim their favorite “candy” when it’s time to hang them!
Final Thought:
Christmas crafting isn’t just about the finished product, it’s about the joy and memories made while creating. So put on some holiday music, grab your supplies, and start rolling, twisting, and gluing your way to a tree that’s as sweet as it is beautiful.