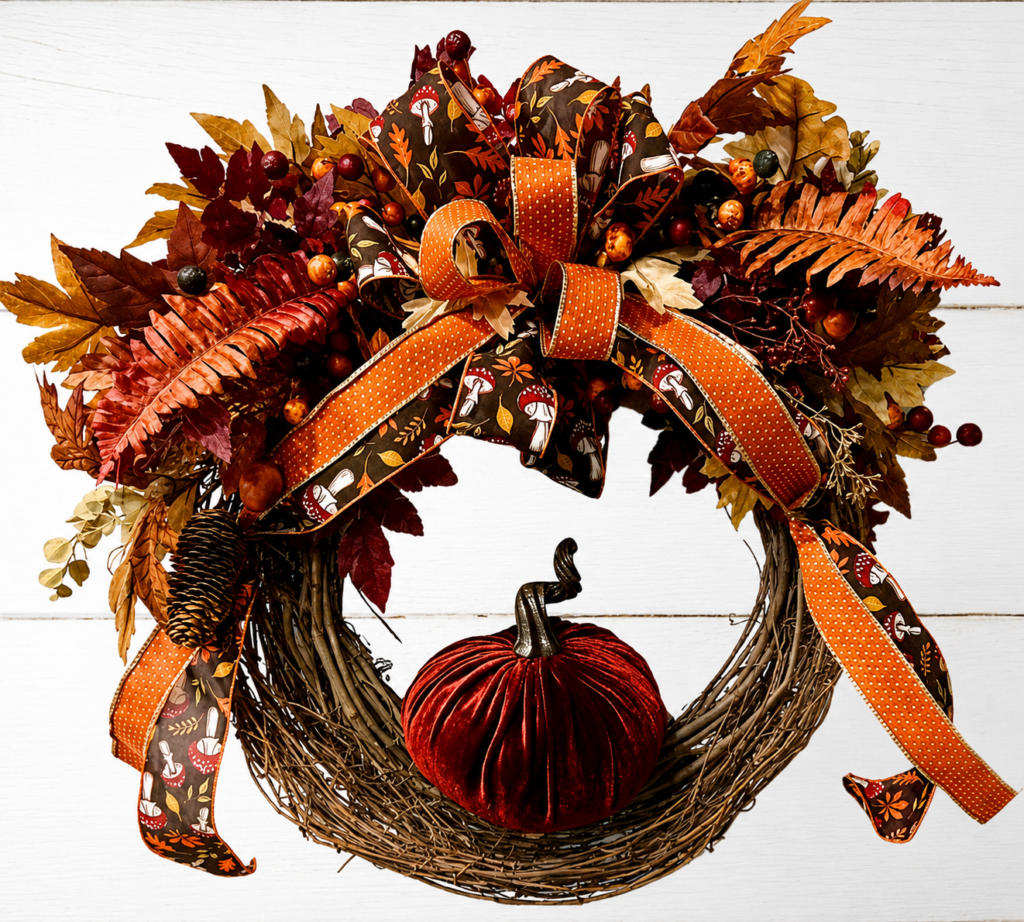

How to Make a Fall Deconstructed Grapevine Wreath with Burgundy Pumpkin
How to Make a Fall Deconstructed Grapevine Wreath with Burgundy Pumpkin
If you love fall wreaths with rich color, texture, and a unique shape, this Fall Deconstructed Grapevine Wreath with Burgundy Pumpkin is such a beautiful project to make. This design starts with a traditional grapevine wreath, but instead of leaving it in its original form, the wreath is carefully taken apart and reshaped into a loose basket-style base. A velvet burgundy pumpkin is tucked into the bottom pocket, and the top is filled with fall fern, burgundy leaves, rust accents, beaded picks, pinecones, acorns, and a gorgeous coordinating bow.
The deconstructed grapevine technique is perfect when you want a wreath that feels more open, airy, and artistic. It also gives you space to add larger attachments, like pumpkins, signs, trucks, or seasonal focal pieces. In this tutorial, the grapevine is pulled apart to create a pocket at the bottom while keeping one tight point at the top to hold the shape together.
Supply List
Grapevine wreath
Velvet burgundy pumpkin
Bind wire
Weaving needle or awl
Zip tie
Wire cutters
Hot glue gun or glue pot
Glue sticks
Fall fern
Burgundy fall leaves
Rust and brown fall leaves
Beaded fall picks
Acorn and pinecone picks
Floral sticks or wooden picks
Fall ribbon with burgundy, rust, brown, and gold tones
Coordinating rust and gold ribbon
Bow maker, optional
Scissors or rotary cutter
Step-by-Step Instructions
1. Choose and Open the Grapevine
Start with a grapevine wreath and look for the thickest section. This will usually become the bottom of your wreath because it gives you more structure for the pumpkin. Find a spot where the grapevine pieces are joined together and begin loosening the wreath.
Do not be afraid to take the grapevine apart. Grapevines are shaped when they are wet, so once they dry, they usually hold that general shape. Even if the wreath loosens quite a bit, it will not completely fall apart unless you really work hard to undo it.
Remove any wire or grapevine pieces that are holding it tightly together. Save those pieces because you can use them later in this wreath or another project.
2. Create the Basket Shape
Once the grapevine is loosened, begin pulling the bottom section outward. The goal is to create a basket-like pocket where the pumpkin can sit. Pull the vines apart gently but firmly until you have a nice open area at the bottom.
Leave one small point at the top where the grapevine stays gathered. This top point will hold the shape together and will also be where the bow is placed later. The bottom should feel loose and open, almost like a little nest or basket.
3. Secure the Top Point
Use bind wire to wrap the top section of the grapevine and hold it together. Twist the wire tightly enough to secure the vines, then tuck the wire ends into the grapevine so they do not show.
This top point is important because it keeps the wreath from opening too much. The bow will also help reinforce this area, so do not worry if it is not beautiful yet. It will be covered.
4. Attach the Burgundy Pumpkin
Place the velvet burgundy pumpkin into the pocket at the bottom of the grapevine. Once you like the placement, use bind wire to secure it in several spots.
If your pumpkin has a button or gathered fabric area on the bottom, use that as one attachment point. You can also push wire through the soft velvet material with a weaving needle or awl. Tie the pumpkin to the grapevine on both sides and at the bottom.
The key is to secure it without pulling the grapevine too tight. You still want that loose basket feeling around the pumpkin.
5. Choose Your Ribbon
For the bow, choose ribbons that coordinate with the pumpkin and fall accents. A ribbon with burgundy, rust, brown, and gold is perfect for this design. Even if the ribbon has a pattern like mushrooms or fall details, the colors are what matter most.
Add a second coordinating ribbon with rust orange and gold to brighten the bow and pull in more fall tones.
6. Make the Bow
Start with about 26-inch ribbon tails. Make a bow with approximately seven loops using the main patterned ribbon. If the ribbon is one-sided, remember to twist or flip it so the pretty side faces up.
Add the second ribbon with about three loops for contrast. Secure the bow with a zip tie, leaving enough length to attach it to the grapevine.
Fluff the loops and separate the tails so the colors spread nicely.
7. Attach the Bow to the Top
Place the bow at the top point where you wired the grapevine together. Wrap the zip tie or wire all the way around the grapevine so the bow also helps hold the wreath shape.
Once attached, fluff the bow again and arrange the tails so they frame the pumpkin and the top floral section.
8. Add Fall Fern
Begin adding the fall fern at the top near the bow. The top is the best place to insert florals because that is where the grapevine is tied together tightly enough to hold stems and glue.
Place fern pieces on both sides of the bow. Use a long piece, then a shorter piece, then another long piece to create balance and movement. Cut stems at an angle so they slide into the grapevine more easily.
9. Add Burgundy and Rust Leaves
Next, add burgundy leaves and rust-toned fall leaves around the fern. Tuck some pieces under the bow and let others come down the sides slightly toward the pumpkin.
When adding new colors, spread them in several places so they look intentional. If you add burgundy on one side, add a little on the other side too. This keeps the design balanced and makes the colors flow naturally.
10. Add Acorns, Pinecones, and Beaded Picks
Now add the smaller fall accents. Acorn and pinecone picks are perfect for this design because they add texture and help fill in the spaces around the bow. If the picks are too short to reach a secure spot in the grapevine, attach them to floral sticks or wooden picks for extra length.
Add beaded picks around the bow and sides for a pretty finishing touch. These little accents help create a high-end fall look and make the wreath feel full without covering the pumpkin.
11. Secure Loose Pieces
If any leaves or picks are not sitting where you want, use a small dab of hot glue on the back to tack them in place. This works especially well for leaves that want to stick out too far or turn the wrong direction.
Check the grapevine pocket around the pumpkin and make sure it still has that open basket shape. Adjust the vines if needed.
12. Final Fluff and Finish
Hold the wreath up and look at it from the front. Make sure the bow is centered, the pumpkin is secure, and the fall accents are balanced. The finished wreath should have a loose, deconstructed basket look at the bottom with a beautiful full fall arrangement at the top.
This Fall Deconstructed Grapevine Wreath with Burgundy Pumpkin is rich, cozy, and full of autumn charm. The velvet pumpkin gives it a soft focal point, while the fern, burgundy leaves, acorns, pinecones, and beaded picks add all the texture that makes fall designs so beautiful.