

How to Make a Stunning Peach and Blue Vintage Clock Grapevine Wreath with Peonies and Connecting Bow
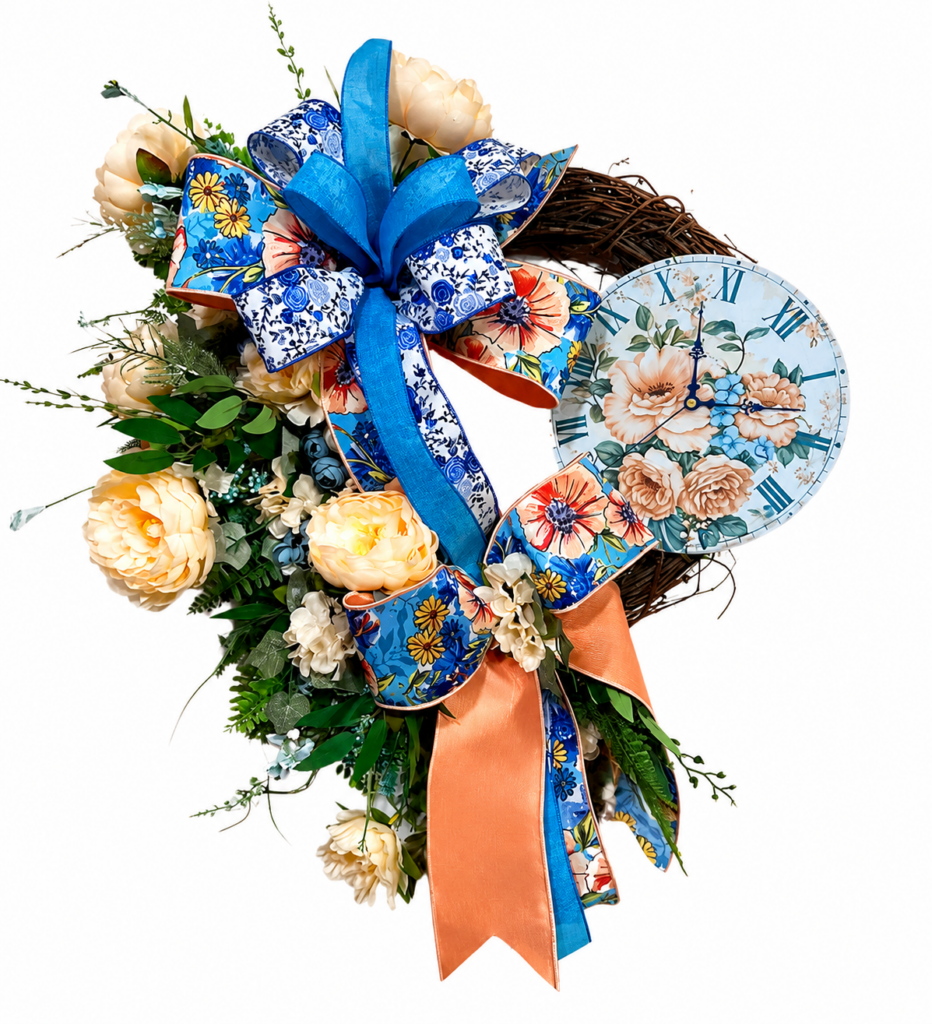
How to Make a Stunning Peach and Blue Vintage Clock Grapevine Wreath with Peonies and Connecting Bow
If you love soft vintage colors, romantic florals, and unique wreath designs, this Peach and Blue Vintage Clock Grapevine Wreath is such a beautiful project to make. This design combines an 18-inch grapevine wreath, a custom vintage clock sign, gorgeous peach and blue ribbon, soft greenery, fern, peonies, hydrangeas, and a special layered bow. The finished wreath has a romantic, vintage-inspired look with just the right amount of color and texture.
The inspiration for this wreath started with a beautiful D. Stevens ribbon in peach and blue. The colors were soft, elegant, and a little unexpected, so a coordinating vintage clock sign was created to match. The sign became the focal point, while the bow, greenery, and flowers helped pull the whole design together. In the video, Lori shares that the ribbon was peach and blue rather than orange, and she made the vintage clock sign specifically to coordinate with it.
Supply List
18-inch grapevine wreath
Vintage clock sign
Hole punch
Bind wire
Weaving needle
Zip ties
Bow maker
Scissors or rotary cutter
Wire cutters
Hot glue gun or glue pot
Glue sticks
Peach and blue D. Stevens ribbon
Coordinating peach ribbon
Light blue ribbon
Blue floral ribbon
Double-sided ribbon
Mixed real touch fern
Additional greenery
Turquoise or blue bead stems
Peony and hydrangea floral bush
Small blue flowers
Small peach or cream filler flowers
Optional floral picks or extra greenery
Step-by-Step Instructions
1. Choose Your Grapevine Base
Start with an 18-inch grapevine wreath. Look over the wreath and decide which side will be the front. Grapevines are naturally uneven, so choose the side that gives you the best shape and the most room for your sign, bow, and florals.
For this design, the sign is placed on one side of the wreath, the bow is placed above it, and the florals flow around the design. This creates a soft crescent shape instead of covering the entire wreath.
2. Choose Your Sign Placement
Place the vintage clock sign on the wreath and move it around until you like the angle. You can place it more toward the side or slightly lower, depending on the look you want.
Once you are happy with the placement, punch a hole on each side of the sign. Thread bind wire through the holes. Bind wire works beautifully on grapevine because it blends in and is easy to hide.
Use a weaving needle to pull the wire through the grapevine. Tie the sign securely to the wreath, then tuck the wire ends into the grapevine so they do not show.
3. Make the Main Bow
The bow is one of the most special parts of this wreath. Start with your main peach and blue ribbon. Measure a tail around 16 inches, then make large loops around 7 inches. This ribbon is the star, so you want it to be visible.
Next, layer in a coordinating ribbon that brings out the peach tones. Make this layer just slightly smaller so the first ribbon still shows around the edges. Add two loops on each side.
Bring in a lighter blue ribbon to pull out the blue from the sign and florals. This helps the wreath feel balanced and keeps the blue from only appearing in one area.
Secure the bow with a zip tie, making sure it stays in the indentation created by the bow maker. Pull the zip tie tight, then fluff the loops so each ribbon can be seen.
4. Attach the Bow
Place the bow above the sign, slightly to the side. Secure it to the grapevine with the zip tie or additional bind wire. Make sure the bow is tight and does not move.
Fluff the loops again after attaching it. Arrange the tails so they flow around the sign instead of covering it.
5. Add a Small Ribbon Accent
To carry the main ribbon down near the sign, cut a piece of the double-sided ribbon about 26 inches long. Dovetail the ends.
Make a small loop, around 4 inches, and secure it with a zip tie. Because this ribbon is thick, a zip tie gives it the support it needs. Attach this small ribbon accent near the lower portion of the sign so the peach and blue colors continue through the design.
6. Add the First Layer of Greenery
Begin with mixed real touch fern. Cut the fern into smaller pieces so it is easier to place. Add greenery behind the bow first, then begin working it down along the grapevine.
When inserting greenery into a grapevine wreath, place the stem with the grain of the grapevine, then pull it outward where you want it to go. This helps the stem stay secure and makes the greenery look more natural.
Add fern near the top and bottom so the design feels connected.
7. Layer Additional Greenery
Next, add another style of greenery with slightly different textures and shades. This gives the wreath depth. Some greenery may not be fully visible once the flowers are added, but it still helps influence the color and fullness of the design.
Layer the greenery underneath the bow, around the sign, and down the side of the wreath. You can choose to decorate only the top and bottom, or continue the greenery all the way down for a fuller crescent.
8. Add Blue Bead Stems
Add turquoise or blue bead stems to bring in more of the blue from the ribbon and sign. Cut the stems into smaller sections and tuck them around the florals and greenery.
Use shorter pieces near the center and longer pieces where you need more movement. These little blue accents help brighten the wreath and make the color palette feel intentional.
9. Add Peonies and Hydrangeas
Now add your flowers. A peony and hydrangea mix works beautifully for this design because it gives you both soft, romantic blooms and smaller filler pieces.
Avoid using flowers that are too large if they overwhelm the wreath. For this design, smaller flowers worked best. Place a small peony under the bow so it peeks out, then add more flowers around the sign and down the side.
Add blue flowers near the top and bottom so the color repeats. If a filler flower has a color that does not match, simply remove that part and use the pieces that do work.
10. Fill in Gaps
Once the main flowers are placed, look for any green areas that need to be broken up with color. Add shorter floral pieces close to the bow and sign. Use small flowers to fill tight spaces where larger stems will not fit.
If you see a hole, move greenery aside and tuck in a floral stem with glue. At this point, the wreath will be full, so take your time finding the right spot.
11. Final Adjustments
Hold the wreath up and look at it from the front. Adjust the bow tails, move any greenery that is sticking out too far, and make sure the sign is still visible.