
Adorable Gingerbread Christmas Wreath DIY | Mrs. Claus Bakery Sign and Ribbon Set
Adorable Gingerbread Christmas Wreath DIY | Mrs. Claus Bakery Sign and Ribbon Set
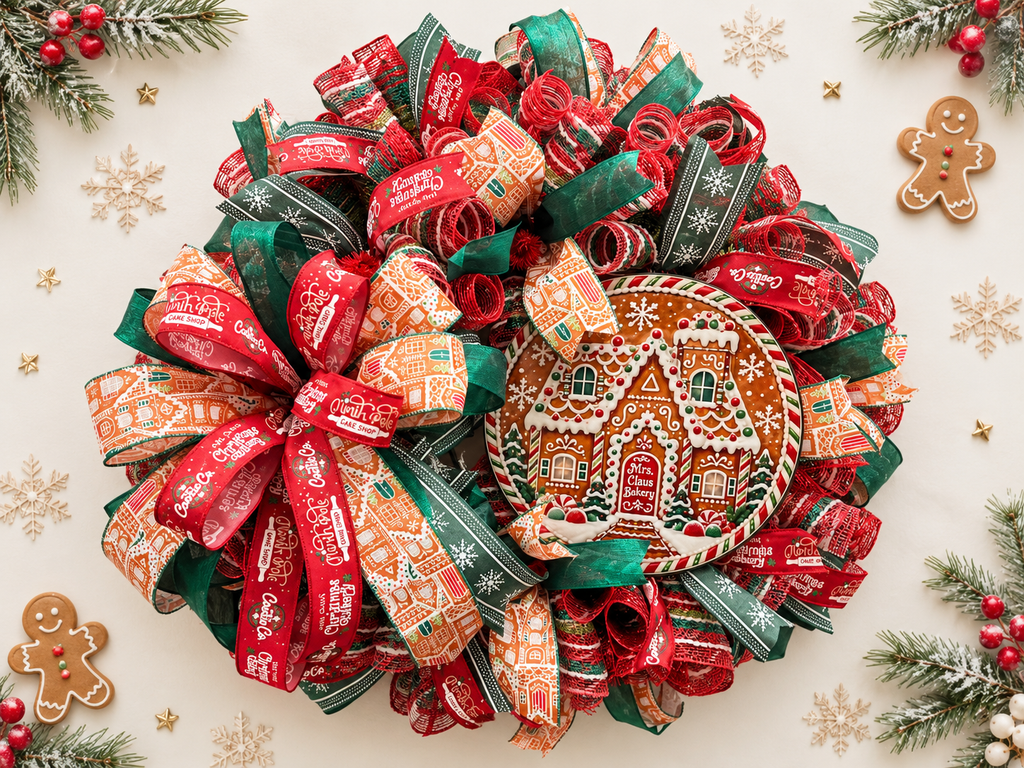
If you love gingerbread Christmas decorations but prefer traditional holiday colors, you’re going to love this adorable Mrs. Claus Bakery Gingerbread Wreath! With beautiful emerald green, vibrant red, snowy deco mesh, and coordinating gingerbread ribbons, this wreath brings together everything we love about Christmas.
Unlike pastel gingerbread designs, this wreath features traditional red and green with just enough gingerbread detail to make it extra special. The adorable Mrs. Claus Bakery sign and matching ribbon bring the entire design together.
For this project, we’re using Woodland Ruffles and Curls to create a beautifully full wreath with lots of dimension. I’ll also show you how to attach your sign off-center and make a gorgeous coordinating bow.
And the best part? The sign and matching ribbons are available together from RCL Signs and More!
Let’s get crafting!
Supply List
- Approximately 15-inch red work wreath frame with ties
- Red and green ombre deco mesh, cut into 20-inch pieces
- Red and green deco mesh with snowflake details, cut into 10-inch pieces
- Mrs. Claus Sign and Ribbon Set
- Gingerbread house wired ribbon
- Emerald green wired ribbon
- Mrs. Claus Christmas Bakery wired ribbon
- Green snowflake wired ribbon
- Mrs. Claus Bakery aluminum wreath sign
- 26-gauge silver floral wire
- Metal hole punch
- Plastic weaving needle
- Bow maker
- Zip tie and pipe cleaner
- Scissors or rotary cutter
- Wire cutters
- Ruffle tool (optional)
Measurements: Cut the woodland ruffle mesh into 20-inch pieces, the additional curls into 10-inch pieces, and all ribbon tails into 12-inch pieces.
Step-by-Step Instructions
Step 1: Prepare Your Wreath Base
Start with a red work wreath frame and open the ties.
I love using work wreath frames because the elevated ties make it easier to create beautiful, dimensional wreaths.
For this design, I’m using a frame approximately 15 inches across, but you can adjust the size depending on your preference.
Step 2: Make Your Woodland Ruffles
Take one 20-inch piece of the red and green ombre deco mesh.
Roll one end inward approximately two complete turns. Repeat on the opposite end.
Now gather the remaining mesh through the center to create a woodland ruffle.
For this particular wreath, we’re making the curls larger and leaving a smaller ruffled section in the middle.
This gives the wreath more dimension and allows those gorgeous Christmas colors to stand out.
Step 3: Add Two Additional Mesh Curls
Take two pieces of the 10-inch red and green mesh with snow details.
Roll each piece into a curl, allowing the natural curve of the mesh to help you.
Place both curls on top of your woodland ruffle.
I love how the snowflake details add a little extra Christmas magic without overpowering the beautiful red and green colors.
Step 4: Add Your Coordinating Ribbon Tails
Take two 12-inch ribbon tails and fold them in half to find their centers.
Pinch the ribbons together and gently run your fingers underneath the wired edges to create a nice curve.
For this wreath, I alternated two coordinating ribbon combinations:
- Gingerbread house ribbon with emerald green ribbon
- Mrs. Claus Christmas Bakery ribbon with green snowflake ribbon
Place the ribbons on top of your mesh and secure everything inside the wreath tie.
Spread your ribbons slightly so the beautiful patterns remain visible.
Step 5: Complete the Bottom Row
Continue around the bottom row, repeating the same process: one woodland ruffle, two curls, and coordinating ribbon tails.
Alternate your ribbon combinations so the gingerbread houses, bakery wording, and snowflakes appear throughout your wreath.
As you work, fluff the mesh and pull the curls apart to create additional fullness.
Don’t worry if your ribbons become slightly squashed. We’ll reshape everything once the wreath is complete!
Step 6: Finish the Top Row
Once the bottom row is finished, move to the top row and repeat the same technique.
There’s more room to spread your ribbons across the top, so take advantage of that space to showcase those beautiful patterns.
I especially love the Mrs. Claus Christmas Bakery ribbon because it coordinates perfectly with the sign.
Keep adjusting the mesh until you have a full, rounded wreath with an even balance of red and green.
Step 7: Attach the Mrs. Claus Bakery Sign
Instead of placing our sign directly in the center, we’re doing something a little different!
Position your Mrs. Claus Bakery sign on one side of the wreath, leaving room for a coordinating bow on the opposite side.
Use a metal hole punch to create attachment holes in the sign.
Cut approximately 20 inches of 26-gauge silver wire for each attachment point. Double the wire and twist it securely.
Thread the wire through a plastic weaving needle and push it through the deco mesh.
Wrap the wire around the actual wreath frame, twisting it securely two or three times.
Important tip: Keep the sign secure without pulling it so tightly that it crushes your beautiful mesh and ribbons.
Step 8: Create Your Matching Christmas Bow
Now let’s make a gorgeous bow using the same coordinating ribbons.
Start with approximately 10-inch tails and 6-inch loops.
Layer your ribbons, creating two loops with each ribbon design.
I like changing the ribbon order slightly so the bow doesn’t look exactly like the ribbon combinations throughout the wreath.
Finish with the Mrs. Claus Christmas Bakery ribbon.
When using ribbon with writing, make your loop first, then flip the entire loop over if the wording is upside down.
This simple trick keeps your lettering facing the correct direction!
Secure your bow with a zip tie and add a pipe cleaner to the back.
Step 9: Fluff and Attach Your Bow
Separate your bow loops and gently twist them back and forth to loosen any ribbon trapped inside the zip tie.
Fluff each loop until your bow looks full and beautiful.
Attach your bow to the opposite side of the wreath from your sign.
Adjust the ribbon tails, spread the mesh, and make sure the gingerbread house and bakery details remain visible.
Ready to Make Your Own Mrs. Claus Bakery Wreath?
I absolutely love how this wreath turned out! The traditional red and green colors make it perfect for Christmas, while the adorable gingerbread details add that extra touch of holiday sweetness.
The Woodland Ruffles and Curls give this wreath beautiful fullness, and the off-center sign and matching bow create a fun, balanced design.
Whether you’re decorating your front door, making Christmas gifts, or creating wreaths to sell, this is a wonderful holiday project to try.
Be sure to check out RCL Signs and More for beautiful Christmas signs and coordinating ribbon sets to make your next wreath even easier!