How to Make a Braided Curl Wreath
How to Make a Braided Curl Wreath: A Fun Twist on Deco Mesh
Looking for a fresh and creative way to use 21” deco mesh in your wreaths? Try the Braided Curl Method! This new wreath-making technique adds a fun twist (literally!) to traditional curls, giving your wreaths beautiful texture and dimension with fewer fray, and fewer supplies. Perfect for summer colors, this method works great with both 10” and 15” mesh cuts.
Supplies Needed:
- 21” deco mesh (4 colors)
- Rotary cutter or scissors
- Fabric clips or clothespins
- 15” wire work wreath form (18 ties)
- Ruler or cutting mat
- Pipe cleaners or zip ties
- Decorative ribbon (cut to 12” lengths)
- Sign of your choice
- 26-gauge floral wire
- Hole punch (for sign)
Step-by-Step Instructions
1. Cut Your Mesh
Start by cutting your 21” deco mesh into 15” lengths. You can use 10” lengths if you prefer, but 15” gives you tighter curls with less fraying, no wood burning needed!
✂️ Pro Tip: Use clips to mark the cut edge so you can keep them tucked under later and reduce fraying.
2. Curl the Mesh
With the mesh facing down (let it curl naturally), roll each piece into a tight curl. Clip the end where the cut edge is to hold the curl in place. Repeat with all your pieces.
You’ll need four curls per wreath section, and you’ll be working in sets.
3. Create the Braided Curl Look
Once you have a set of four curled pieces:
- Arrange the curls so the clips (cut ends) face downward.
- Gently twist and braid the curls together to form a pretty pattern.
- Place the twisted bundle into a wreath tie, making sure the ends stay tucked under.
🌀 No need to be perfect—just twist until it looks full and fun!
Repeat for five sections on the bottom and four sections on the top of your wreath form.
4. Add Ribbon
Cut your ribbons into 12” lengths and dovetail the ends. For each wreath section:
- Pinch in the center and add the ribbon to the tie.
- Pull the ribbons forward to show off the braid behind them.
- Alternate colors for added dimension.
🎀 You can skip the ribbon if you don’t want to hide the braided curls!
5. Attach a Sign
Pick a sign that matches your mesh colors. Punch holes in the top and bottom, then attach 26-gauge wire.
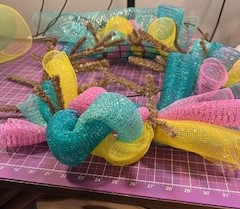
To prevent the sign from sinking:
- Use pipe cleaners to create a mesh base across the middle and vertical sections of the frame.
- Thread your sign wire through the mesh base and frame.
- Twist and secure tightly on the back.
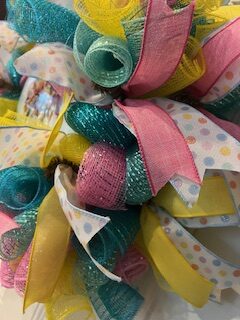
Finished Look
Once everything is attached and fluffed, you’ll have a stunning wreath with bold braided texture and vibrant summer colors. The curls hold their shape beautifully, and the braided design peeks through, adding something unique and eye-catching.
Why You’ll Love This Method
✅ Uses less mesh than full curl wreaths
✅ No wood burning required with 15” cuts
✅ Braided texture adds a creative, dimensional look
✅ Easy to adapt for any season or color scheme
Final Thoughts
The Braided Curl Wreath Method is a great way to elevate your wreath-making game. Whether you’re prepping for craft fairs or just decorating your door, this technique makes a showstopper every time.
Happy crafting!
Learn how to make a braided curl wreath using 21” deco mesh in this fun DIY tutorial. This unique method gives you full, textured wreaths with fewer frays—perfect for summer and beyond!
Let me know what you think, and if you give it a try, tag me, I’d love to see your version! 💖
Happy crafting,
Lori
Hard Working Mom
P.S. Want even more crafty tips? Check out the latest signs and ribbon sets I just added to the shop—they pair perfectly with this wreath style! Shop Now