
DIY Tier Tray Tutorial: Step-by-Step Guide to Painting, Assembling & Styling
DIY Tier Tray Tutorial
A tier tray is one of the most versatile pieces of home décor you can own. It’s perfect for displaying seasonal items, soaps, baked goods, or even crafting supplies. Today, we’re taking a basic tier tray kit and turning it into a beautiful, rustic-chic display piece with just a little paint, glue, and creativity.
Whether you prefer a farmhouse white finish, a pop of color, or a weathered wood look, this project can be customized to fit your style. Let’s get started!
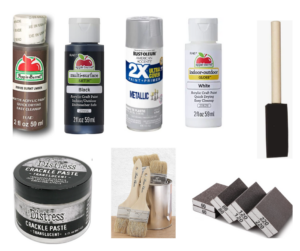
Supplies You’ll Need
- Tier tray kit (includes bottom piece, middle piece, top piece, and connectors/legs) From Woodpecker Crafts
- Wood glue – I recommend Titebond for strength; use Quick & Thick if you want faster drying
- Paint – Apple Barrel or similar acrylic craft paint in your chosen colors (we’re using white and chocolate brown)
- Chip brush – For dry brushing and creating a rustic look
- Foam sponge brush or roller – For smooth base coats
- Small paintbrush – For detail work
- Paint palette or egg tray – To hold paints and glue
- Lazy Susan or turntable – Optional, but makes painting easier
- Sandpaper or sanding block – If you want a smoother finish (kit is pre-sanded)
- Paper towels or tissue paper – For dabbing excess paint during dry brushing
- Optional: Gorilla Glue for quick tacking, spray paint (Rustoleum works best), or Mod Podge for smoother finishes
Step 1: Unpack & Plan Your Tray
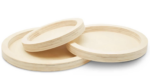
Your kit will have three tray pieces: the large bottom tier, the medium middle tier, and the smaller top tier. It also comes with connector pieces for stacking and feet for the base.
Decide how you want to position your trays:
- Rim up for a bowl-like look that helps hold items (great for soaps or ornaments)
- Rim down for a flat serving style (like a cupcake stand)
We’ll be doing the rim-up version for this tutorial.
Step 2: Assemble the Center Support
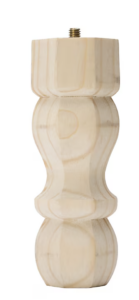
For the bottom connector, one piece will have a screw that fits into a pre-drilled hole on the bottom tier. Screw it in securely; this is where most of the tray’s weight will be supported.
You can glue the connectors in place for extra stability, but be sure not to get glue where it will show.
Step 3: Apply Your Base Coat
- Squeeze paint into the largest section of your palette.
- Use a foam sponge brush to apply paint to each tray piece.
- Work in light coats, making sure to get into the grooves and edges.
- Avoid painting areas that will be glued together—this helps the adhesive bond better.
- Let each coat dry before flipping or stacking pieces.
💡 Tip: A sponge brush gives great coverage and makes it easier to get into textured areas, but it soaks up more paint. A small roller is faster for smooth surfaces.
Step 4: Dry Brushing for a Rustic Finish
This technique adds character and dimension to your tray.
- Load a chip brush with a small amount of chocolate brown paint.
- Dab off most of the paint onto tissue paper or a paper towel until the brush is almost dry.
- Lightly sweep the brush over edges, corners, and raised details.
- Focus on spots where natural wear would occur, like edges and grooves, for an authentic look.
- Keep it light. You can always add more, but heavy strokes will look blotchy.
If you want a heavier rustic look, skip some dabbing so more paint transfers.
Step 5: Painting the Connector Pieces & Feet
These small parts can be tricky to hold while painting.
- Place them in a bag with a little paint and shake for even coverage.
- Or, hold them with a toothpick and brush on paint.
- For an ultra-smooth coat, mix a few drops of Mod Podge into your paint. This helps it go on evenly without streaks.
Let them dry completely before assembly.
Step 6: Final Assembly
- Brush wood glue onto the bottom connector where it meets the tray.
- Place the middle tray on top, making sure it’s centered.
- Repeat with the top connector and tray.
- Attach the feet to the bottom tier to prevent scratching surfaces.
- Wipe away any glue that seeps out before it dries.
Step 7: Let It Cure
Even if the glue feels dry to the touch, give your tray a few hours to fully set before adding weight. Overnight is best for maximum strength.
Step 8: Style & Display
Now comes the fun part: decorating your finished tier tray!
- For the kitchen: Display soaps, mugs, spices, or seasonal treats.
- For the living room: Add candles, greenery, or small decorative signs.
- For crafting: Use it as a riser for craft show displays or to hold small supplies.
The beauty of a tier tray is that you can change it out for every season or event.
Extra Ideas
Once you’ve mastered one tray, try these variations:
- Spray paint finish: Use Rustoleum for a sleek, even coat, great for modern looks.
- Pastel spring tray: Paint each tier a different soft pastel color.
- Distressed farmhouse tray: Layer two paint colors and sand back for a weathered look.
- Mini risers: Use leftover pieces or smaller connectors to create single-tier stands for candles or plants.
Final Thoughts
Making your own tier tray is not only satisfying but also allows you to completely customize the look for your home or business. With just a few supplies and a little time, you can create a piece that’s both beautiful and functional.
So grab your kit, pick your paint colors, and start crafting. Your perfect display piece is just a few brush strokes away.