
How to Make a Christmas Candy Cane Decoration with a Dollar Tree Form
How to Make a Christmas Candy Cane Decoration with a Dollar Tree Form
One of the easiest and most festive DIY Christmas projects you can make is a candy cane decoration using the wire forms from Dollar Tree. Not only is this project budget-friendly, but it’s also highly customizable; you can create candy canes in any color scheme to match your holiday décor. Whether you love the classic red and white look, a farmhouse style with buffalo plaid, or modern metallics with silver and gold, this tutorial will show you how to create a beautiful piece that can be hung on your door, wall, or even used as part of a larger wreath display.
Let’s dive into how you can make your own Christmas candy cane!
Supplies You’ll Need
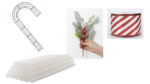
- Dollar Tree candy cane wire form
- 2.5” or 1.5” ribbon (about 5 yards) – wired works best
- Hot glue gun and glue sticks (or adhesive of choice)
- Pipe cleaners or floral wire
- Scissors
- Optional: mesh ribbon, decorative picks, ornaments, or embellishments
- Bow (handmade or pre-made)
Step 1: Start Wrapping the Candy Cane
Begin with your Dollar Tree wire candy cane form. Cut a length of ribbon from your roll (you’ll need about 5 yards total, but it’s easier to work with smaller sections). Note: Candy Cane form can also be found at Walmart and Craft Outlet.
- Overlap the end of your ribbon slightly at the bottom of the form.
- Secure it in place with a small bead of hot glue. Be careful not to burn your fingers—use a craft stick or the edge of your scissors to press the ribbon down if needed.
- Think of this step like wrapping a present. You want a neat and clean starting edge.
Step 2: Continue Wrapping and Gluing
Once the ribbon is secured, start wrapping it around the form in a diagonal pattern. Every two or three wraps, add a dab of hot glue to keep the ribbon in place.
Pro Tip: Pull out a good amount of ribbon before you start wrapping so you don’t have to tug against the roll while working. This helps prevent twisting and keeps your wraps smooth.
As you move up the form, overlap the ribbon slightly so there are no gaps. If the ribbon starts to buckle around the curves of the candy cane, don’t worry; you’ll cover it with your next wrap.
Step 3: Secure the End
When you reach the top of the candy cane, trim your ribbon neatly. Tuck the end under the last wrap and secure it with hot glue. Press it down carefully to create a finished edge. Do the same at the bottom of the form if needed.
Now you have the base of your candy cane completely wrapped and ready to decorate. Even at this stage, it’s already cute enough to hang as-is!
Step 4: Make a Bow
A candy cane wouldn’t be complete without a big festive bow. For this tutorial, I made a Terry bow with layered ribbons in different patterns and widths. Here’s a simplified breakdown:
- Cut ribbon strips in varying lengths (about 3–5 inches for loops, 22 inches for tails).
- Layer them together, alternating colors and patterns.
- Pinch them in the middle and secure with a pipe cleaner or floral wire.
- Add tails by cutting two long ribbon strips, folding them in half, and attaching them under your bow.
- Fluff your loops by pulling them in opposite directions.
You can use traditional Christmas colors like red, green, and gold, or mix it up with farmhouse plaids, glittery silvers, or even teal and pink for a whimsical theme.
Step 5: Attach the Bow
Secure your bow to the middle or bottom of your candy cane using the pipe cleaner or floral wire. Twist it tightly around the frame so it stays in place. Fluff the loops and adjust the tails until you’re happy with how it looks.
Step 6: Add Embellishments (Optional)
This is the fun part: adding extra decorations to make your candy cane unique! You can hot glue or tuck in:
- Mini ornaments
- Glittery picks or sprays
- Faux candy pieces (peppermints, lollipops, gumdrops)
- Snowflakes or reindeer embellishments
- Sparkly tinsel or ribbon curls
These details give your candy cane personality and can tie it into the rest of your holiday décor.
Finished Candy Cane Decoration
And there you have it: a beautiful, custom Christmas candy cane decoration made with just a Dollar Tree form, some ribbon, and a few embellishments. This project is quick, affordable, and versatile. You can make several of them for gifts, decorate both sides of your front door, or hang them indoors on stair rails, mantels, or walls.
It’s also a great craft to do with friends or kids, since the wrapping is simple and the decorating part is where creativity really shines.
Tips and Variations
- Ribbon Choice: Wired ribbon works best since it holds its shape, but mesh ribbon is also a great option for a textured look.
- Color Schemes: Classic red and white is timeless, but try silver and blue for a winter wonderland theme, or rustic plaids for farmhouse style.
- Budget-Friendly: Dollar Tree often has holiday ribbons, but you can also use larger 50-yard rolls from Sam’s Club or craft stores for multiple projects.
- Gift Idea: Add a name tag to turn your candy cane into a personalized gift or hostess present.
