
How to Make an Easy Summer Bow in Beautiful Shades of Blue
How to Make an Easy Summer Bow in Beautiful Shades of Blue
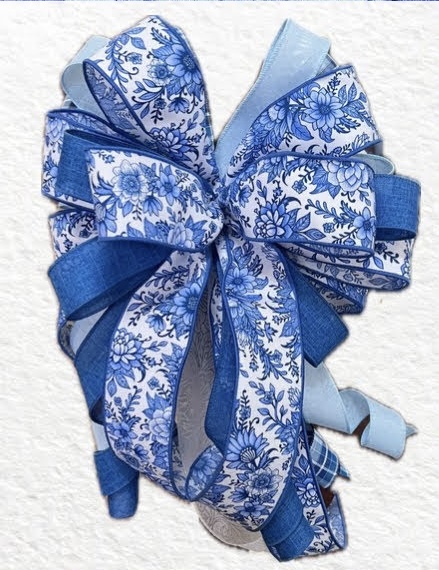
If you love decorating with soft, pretty shades of blue, this Easy Summer Bow is a beautiful project to make for a wreath, staircase, lantern, mailbox, door hanger, or floral arrangement. This bow was created to coordinate with a blue summer wreath, but it can easily be used anywhere you want a fresh, elegant pop of color. The mix of white, light blue, royal blue, and floral ribbon gives it a bright summer feel while still looking classic and full.
This bow is also a great beginner-friendly project because it uses simple loops, long tails, and a few different ribbon patterns layered together. You can use a bow maker to keep your loops consistent, but once you understand the process, you can also make a similar bow by hand. The biggest trick to making a beautiful bow is not just the ribbon you choose. It is the fluffing. Taking a few extra minutes to pull apart the loops, loosen the center, and curl the tails makes all the difference.
Supply List
Bow maker
Five coordinating wired ribbons in shades of blue and white
White ribbon
Light blue ribbon
Royal blue ribbon
Blue floral ribbon
Blue patterned ribbon
Pipe cleaner
Zip tie
Scissors or rotary cutter
Ruler or measuring mat
Optional wreath, staircase, lantern, or decor piece for display
Step-by-Step Instructions
1. Choose Your Ribbon Colors
Start by choosing five wired ribbons that coordinate well together. For this bow, the colors are all in shades of blue and white. A white ribbon creates a clean base, while the blue ribbons add depth and color. A floral ribbon works beautifully as the focal ribbon because it brings all the shades together.
When choosing ribbon, look for a mix of solids, patterns, and focal prints. You might use white, light blue, royal blue, Swiss dot, floral, stripe, or watercolor-style ribbon. The variety makes the bow more interesting and helps each layer stand out.
2. Dovetail the First Ribbon
Start with your white ribbon. To dovetail the end, fold the ribbon in half lengthwise and cut upward toward the wired edge. Make sure you are cutting toward the wire so the tail opens into a pretty V shape. If you cut the wrong direction, you may end up with a point instead of a dovetail.
Dovetailing gives the bow a finished, professional look.
3. Measure the First Tail
Measure out a 12-inch tail and place the ribbon into your bow maker. This first ribbon will help create the foundation of the bow.
Make a 6-inch loop by bringing the ribbon over to the 6-inch mark. Hold it in place, then twist the ribbon in the center. You only need to twist on the side where you are getting ready to make the next loop. This keeps the pretty side of the ribbon facing forward.
4. Make the First Set of Loops
Continue making 6-inch loops with the white ribbon. For this bow, make three loops. Twist the ribbon in the center each time you cross over to create another loop.
On the final loop, you do not need to twist again. Just bring the ribbon out to create your ending tail. Cut the tail and dovetail the end.
5. Add the Second Ribbon
Next, add a blue patterned ribbon. Measure a slightly longer tail, around 14 inches, because this tail can be curled later for extra movement.
Place the ribbon into the bow maker and create two loops. Keep the loops close to the same size as the first layer, around 6 inches. The second ribbon should sit nicely on top of the white base and begin adding more color.
6. Add Light Blue Ribbon
Now bring in a light blue ribbon. This softens the bow and adds another shade of blue. Make two loops with this ribbon, again keeping the loops around 6 inches.
Remember, there is no strict rule that says your bow has to be three loops, then two loops, then one loop. You can do three, two, one, or you can do three, three, two, two. The important thing is to keep the bow balanced and full.
7. Add the Focal Floral Ribbon
Now add your focal ribbon. This is the ribbon you really want people to notice, so place it toward the top of the bow.
If your floral ribbon has a directional pattern, pay attention to which way the flowers are facing. Make your first loop, then if the pattern is going the wrong direction, pick up the loop and flip it over. This allows all the flowers to face the same way and keeps the bow looking intentional.
Make a few loops with the focal ribbon so the pattern is visible from different angles.
8. Add Royal Blue Ribbon
Bring in the royal blue ribbon toward the top. This deeper blue adds contrast and pulls out the darker shades from the floral ribbon. Make two loops with the royal blue ribbon.
Place it high enough in the bow so that beautiful pop of blue can be seen clearly.
9. Finish with One More Focal Loop
To finish the layers, add one more loop of the focal floral ribbon on top. Make this loop just a little smaller, around 5 1/2 inches, so it sits nicely in the center and does not cover everything underneath.
This final loop brings the main ribbon back to the top and ties the whole bow together.
10. Secure the Bow
Run a zip tie underneath the bow while it is still on the bow maker. Pull the bow out carefully, making sure the ribbon stays in the center indentation created by the bow maker. That little indentation helps keep all the loops lined up and prevents them from shifting into different sizes.
Before tightening the zip tie completely, add a pipe cleaner to the back. This will let you attach the bow to a wreath, staircase, lantern, or other decor piece. Pull the zip tie tight, then trim the excess.
11. Pull Out the Loops
Lay the bow flat and start pulling the loops apart. Pull some loops to the left and some to the right. Bring all the tails forward so you can see what you are working with.
This step begins the fluffing process and helps you see the shape of the bow.
12. Fluff the Bow
To fluff the bow, gently twist and move the loops back and forth near the center. This helps loosen any ribbon pieces that are stuck down inside the bow. Once those hidden pieces are released, the loops can expand fully.
If you hear someone say “break the bow,” this is what it means. You are not damaging it. You are breaking the ribbon free from the tight center so it can open up and look full.
13. Shape and Curl the Tails
Run your hands underneath the tails to smooth them out. For a soft curl, place your thumb under the ribbon and gently slide your other hand up while twisting the ribbon around your thumb. Keep the curl loose instead of tight.
Curling a few tails adds movement and makes the bow look elegant and finished.
14. Final Touches
Once the bow is fluffed, check the balance. Make sure each ribbon color is showing and the focal floral ribbon is easy to see. Adjust the loops and tails until the bow looks full and even.
This Easy Summer Bow in beautiful shades of blue is perfect for adding a fresh seasonal touch to your home decor. Use it on a wreath, stairway, lantern, mailbox, or centerpiece. With pretty ribbon, consistent loops, and good fluffing, you can create a bow that looks full, polished, and ready for summer.