
Welcome Cherry Deco Mesh Ruffle Wreath DIY Tutorial
Welcome Cherry Deco Mesh Ruffle Wreath DIY Tutorial
Looking for a sweet and cheerful wreath project that screams summer charm? This Welcome Cherry Deco Mesh Ruffle Wreath is bursting with bold colors, rustic accents, and handmade cherry attachments that add the perfect pop of personality. Whether you’re prepping for a craft fair or sprucing up your front door, this wreath is a crowd-pleaser!
Bonus: You can grab the full sign and ribbon set from RCL Signs and More!
Click here to learn how to make the Cherry Wreath Attachment
🧵 Supplies Needed:
- 24″ Pine wreath base
- 10″ red and white striped deco mesh (1 roll)
- Cherry welcome sign
- Coordinating ribbon set (2.5″ and 1.5″)
- Handmade cherry wreath attachments
- Pipe cleaners (regular and jumbo)
- Zip ties
- Bow maker (optional)
- Weaving needle
- Hot glue gun and glue sticks
- Cherry wreath attachment
🍒 Step-by-Step Instructions:
Step 1: Prep Your Pine Wreath
Fluff out your 24″ pine wreath. You don’t need to go overboard with fluffing; most of the base will be covered with mesh and embellishments. We’re using pine because it’s easier to secure signs and attachments. Pine bases are excellent for attaching multiple elements in a wreath. The pine base will not be seen once all the components are added.
Step 2: Cut & Ruffle the Mesh
Cut your 10″ red and white striped mesh into 20″ strips. You should get about 18 ruffles from one roll, plenty for this design.
To make a ruffle:
- Tuck the ends under slightly to prevent fraying.
- Gather straight up the center like a bow tie.
- Secure the ruffle into the middle of the pine ties all the way around the wreath.
- Use the remaining mesh to create ruffles around the bottom.
- Spread the ruffles out to cover the pine base.
Step 3: Add the Welcome Sign
Use a weaving needle to attach your cherry-themed sign. Thread floral wire or pipe cleaner through the holes, then twist it securely around the wreath frame. Position it in the center toward the top or in the middle of the wreath.
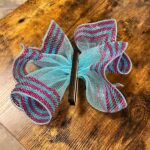
Step 4: Make Spider Bows
Create two spider bow, one large for the top and one smaller for the bottom:
- Use 3-4 different ribbons in 6″ widths.
- This bow is made of 4 layers using 4 different ribbons; each layer is a 3-loop bow.
- Alternate sides on your bow maker for an even, layered look.
- Use a zip tie to secure, then fluff the loops and tails to your liking.
- Attach them to the wreath with another zip tie or pipe cleaner.
Step 5: Attach the Cherries
Use jumbo pipe cleaners (great for stems!) to secure the handmade cherry attachments. Twist them tightly around the pine ties or directly into the frame. You can add a dab of hot glue to lock them in place. Watch the video to see how we made the cherry wreath attachment.
Step 6: Add Ribbon Tails
Cut 12″ ribbon tails and dovetail the ends. Tie them in using the pine tips in between the mesh and bows for extra texture and movement. You won’t need too many, just enough to fill in gaps and balance the design.
Step 7: Embellish (Optional)
Add a few red, white, and blue sprays or faux florals for a fun, wispy effect. Use hot glue to secure them into the pine branches under your bows or around the cherries.
🖼️ Final Look
The result is a full, vibrant wreath that’s sweet, summery, and bursting with charm! You can customize it with different ribbon patterns, or even swap the cherries for pumpkins, apples, or scarecrows as the seasons change.
✨ Tips from Lori:
- No bow maker? Use your fingers, just tuck and twist!
- Puffy paint on the leaves gives your cherries a realistic touch.
- You only need one roll of mesh thanks to the fullness of the pine base.
- You can grab the sign and ribbon set in my shop here!
