

Adorable Halloween Ghost Deco Mesh Wreath with Mini Bows: Experimenting with TEMU Mesh and Ribbon
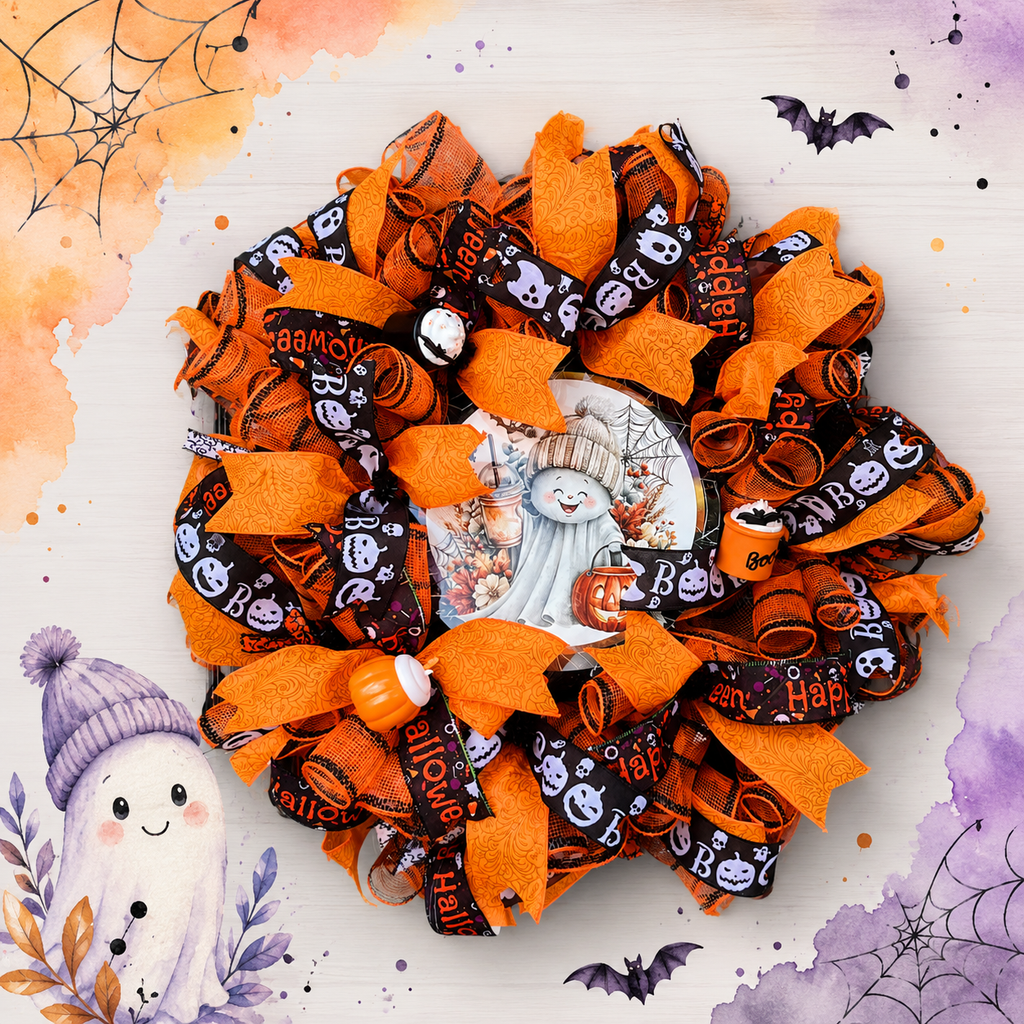
Adorable Halloween Ghost Deco Mesh Wreath with Mini Bows: Experimenting with TEMU Mesh and Ribbon
If you love cute Halloween decor that is fun, festive, and not too spooky, this Adorable Halloween Ghost Deco Mesh Wreath is the perfect project. This design has a sweet ghost sign, orange, black, and white mesh, playful ribbons, mini bows, and a few inexpensive Halloween embellishments that make the whole wreath come together beautifully.
For this wreath, I experimented with a Halloween mesh and ribbon set from Temu. The set included multiple rolls of mesh and several 5-yard ribbon rolls, making it a budget-friendly option for creating more than one project. The ribbons were a little different from standard wreath ribbon because they were 2 inches wide, but they still worked perfectly in the design. I paired them with regular orange ribbon, leftover mesh from Deco Exchange, and cute Halloween pieces from Target’s seasonal dollar spot.
This wreath is made with a black deco mesh poof base, orange and black woodland ruffles, small crisscross ribbon bows, a ghost sign, and a coordinating handmade bow. It is full, adorable, and perfect for your front door, porch, craft booth, or Halloween decorating.
Supply List
Work wreath frame with ties
Black metallic deco mesh
Orange and black striped deco mesh
Orange mesh or leftover accent mesh
Halloween ribbon set
Orange ribbon
Ghost Halloween sign
Small Halloween embellishments from Target or similar store
26-gauge wire
Pipe cleaners
Zip ties
Metal hole punch
Plastic weaving needle
Bow maker
Scissors or rotary cutter
Wire cutters
Deco mesh ruffle tool or clips, optional
Step-by-Step Instructions
1. Prepare Your Wreath Frame
Start with a work wreath frame and open all the ties. This makes it easier to add your mesh without having to stop and open each tie as you go.
For this wreath, the base is made with black metallic deco mesh. Gather the end of the mesh together and secure it to the frame using a zip tie right before one of the ties. Starting with a zip tie helps keep the wreath clean and allows you to use that first tie later so the starting point is hidden.
2. Make the Black Mesh Poofs
To make the poofs, tuck the rough edges of the mesh under so they do not stick out. Use your hands to measure across two ties, then come back one tie. This creates about a 10-inch poof.
Secure the poof into the tie, then continue around the bottom row of the wreath. When you get back to where you started, use the tie you skipped at the beginning to hide the starting point.
Once the bottom row is finished, pull the mesh up to the top row and continue making poofs the same way. When you finish, cut the mesh and secure the end to the back of the frame.
3. Cut and Prepare the Woodland Ruffles
For the next layer, cut 18 pieces of orange and black striped mesh at 20 inches each. This will give you one woodland ruffle for each tie.
To make a woodland ruffle, curl one end of the mesh two or three times and hold it in place with a clip or ruffle tool. Then curl the other end two or three times. Scrunch the mesh up the middle so it forms a ruffle with little curled ends, almost like bird wings.
The woodland ruffle is a great choice because it helps hide fraying and gives the wreath a cute, full look with curled edges peeking out.
4. Make the Mini Bow Ribbon Ties
For the bottom row, add small crisscross ribbon bows with your woodland ruffles. I cut 18 orange ribbon pieces at 12 inches and cut the patterned Halloween ribbons at 12 inches as well.
To make the mini bow, crisscross the ribbon like an awareness ribbon, then push the loops down toward the center. Place it on top of the woodland ruffle and add both pieces into the wreath tie together. I cut 10 pieces at 15 inches. This creates a cute little bow look without having to make separate bows for every section.
Twist the tie closed and fluff the woodland ruffle and ribbon.
5. Add Woodland Ruffles Around the Wreath
Continue adding one woodland ruffle and one mini ribbon bow to each tie on the bottom row.
On the top row, you can keep it a little simpler by adding the woodland ruffle and ribbon tails in an X shape instead of the mini bows. The top row is smaller and more compressed, so the mini bows can get squished. Spreading the ribbon in an X shape helps it show nicely without overcrowding the wreath.
6. Attach the Ghost Sign
Once your mesh and ribbons are in place, add the ghost sign. Use a metal hole punch to punch a hole on each side of the sign.
Cut pieces of 26-gauge wire about 20 inches long. Thread the wire through each hole, fold it together, and twist it close to the sign so it does not slide around.
Place the sign in the center of the wreath. Use a plastic weaving needle to pull the wire down through the mesh and tie it around the frame. This keeps the sign secure and makes it much easier to attach without crushing the mesh.
7. Add Small Halloween Embellishments
Add small Halloween pieces, such as pumpkins, ghosts, or little decorative accents. These can be tied into the wreath using the existing ties.
I found some cute Halloween embellishments from Target’s seasonal section that matched the ghost sign perfectly. These little pieces are inexpensive but add so much personality to the wreath.
8. Make the Coordinating Bow
Use the leftover Halloween ribbons to make a coordinating bow. Start with a 12-inch tail and make 6-inch loops. Add another ribbon layer with a longer tail, around 18 inches, if you only have enough ribbon for one loop.
If your patterned ribbon faces the wrong direction, make the loop first, then pick the loop up and flip it over. This will turn the design the right way so both sides match.
Add another ribbon layer slightly smaller, around 5 inches, so the ribbon behind it still shows. Finish with a small accent ribbon or leftover mesh to add extra texture. Secure the bow with a zip tie and add a pipe cleaner to the back for attaching.
9. Fluff and Finish the Bow
Fluff the bow by twisting each loop back and forth and pulling out any pieces stuck in the center. Run your hands under the ribbon tails to smooth out bumps and help the wired edges shape nicely.
Attach the bow to the wreath wherever you like best. You can place it at the bottom, side, or top. For this design, the bow coordinates beautifully with the ghost sign and adds one more playful Halloween detail.
10. Final Fluffing
Hold the wreath up and check the overall shape. Pull out the ribbons, fluff the woodland ruffles, straighten the sign, and adjust the mini bows. The finished wreath should look full, fun, and adorable without being scary.
This Halloween Ghost Deco Mesh Wreath is a great beginner-friendly project and a fun way to test out budget-friendly mesh and ribbon. With a cute sign, playful mini bows, and simple woodland ruffles, you can create a festive Halloween wreath that is perfect for your front door.