

DIY Spooky Cute Halloween Witch Cat Deco Mesh Wreath With Ruffles and Curls
DIY Spooky Cute Halloween Witch Cat Deco Mesh Wreath With Ruffles and Curls
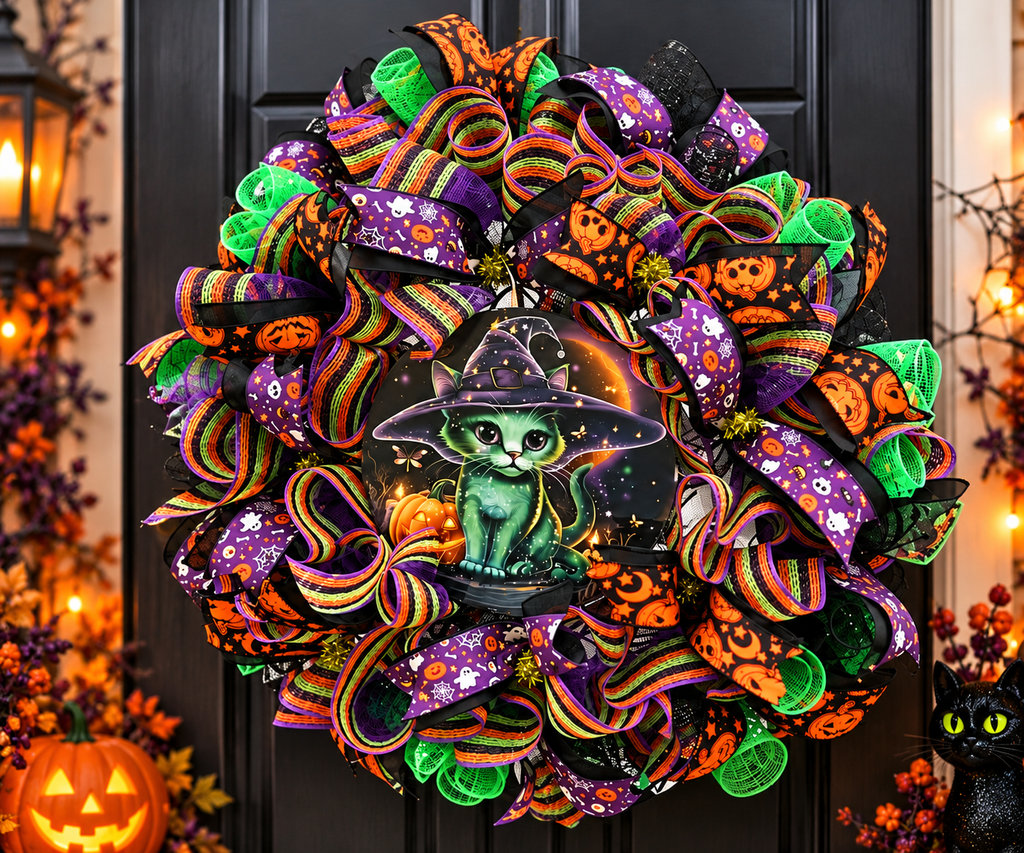
If you love Halloween decor that is more cute than scary, this Spooky Cute Halloween Witch Cat Deco Mesh Wreath is such a fun project to make. It is full of bright Halloween colors, playful ribbon, glittery mesh, and an adorable witch cat sign that makes the whole wreath feel festive and whimsical.
This wreath was inspired by a Halloween sign with a cute black cat, witchy details, and lots of sparkle. The colors in the sign are purple, green, orange, and black, so those same colors are repeated throughout the mesh and ribbon. I used a pretty Halloween mesh with purple, green, orange, and black, along with leftover black and green mesh from another project. This is a great reminder that leftover mesh can easily be used in your next wreath instead of going to waste.
For this design, the bottom row has both ruffles and curls, while the top row uses ruffles and ribbon only. This helps the wreath stay full without overcrowding the top, where space is tighter. The finished wreath is colorful, full, and perfect for a front door, porch, craft show, or Halloween gift.
Supply List
Work wreath frame with ties
Halloween witch cat sign
Halloween deco mesh in purple, green, orange, and black
Black deco mesh
Green deco mesh
Purple Halloween ribbon
Orange and black Halloween ribbon
Black ribbon
Green and orange reversible ribbon
26-gauge wire
Metal hole punch
Plastic weaving needle
Bow maker
Zip ties
Scissors or rotary cutter
Wire cutters
Step-by-Step Instructions
1. Choose Your Sign and Colors
Start with a Halloween sign that gives you your color palette. For this wreath, the sign has a witch cat theme and includes purple, green, orange, and black. Using the sign as your guide makes it easier to choose mesh and ribbon that all coordinate.
This design is especially cute if you love cats or want something Halloween themed without it being too spooky. The cat sign adds personality, while the colorful mesh keeps it bright and playful.
2. Cut Your Mesh and Ribbon
For the main ruffles, cut your Halloween deco mesh at 20 inches. For the curls, cut your black and green mesh pieces at 10 inches each. The ribbons are cut at 12 inches.
I used 20-inch ruffles, 10-inch curls, and 12-inch ribbon tails for this wreath.
You will use one ruffle, one green curl, one black curl, and one set of ribbon tails on the bottom row. On the top row, you will use the ruffle and ribbon tails without the curls so the wreath does not get too crowded.
3. Make the Bottom Row Ruffles
Take one 20-inch piece of Halloween mesh. Curl the bottom edge under one good time to tuck in the frayed edges. Then gather the mesh straight up the center to make a ruffle.
Place the ruffle into one of the bottom ties on your wreath frame, but do not close it completely yet.
4. Add the Curls
Next, take one green mesh curl and one black mesh curl. Roll each piece into a curl, then place them on top of the ruffle. The curls add extra dimension, color, and sparkle to the bottom row.
Using curls on the bottom gives the wreath more fullness and lets you bring in extra color without taking over the design. The green and black also help pull out the darker Halloween colors from the sign.
5. Add the Ribbon Tails
Take your 12-inch ribbon pieces and fold each one in half to find the center. Pinch the center together, then run your hands under the wired edges to shape the ribbon. This helps the ribbon lay nicely across the mesh and makes it easier to position.
Place the ribbon tails on top of the ruffle and curls, then twist the tie closed. Spread the ribbon tails apart so both patterns show. I point out that shaping the ribbon with your hands helps move the ribbon where you want it and helps it go across the mesh nicely.
6. Continue Around the Bottom Row
Repeat the same process all the way around the bottom row: one ruffle, one green curl, one black curl, and one set of ribbon tails.
As you go, pull the ruffles upward and spread out the ribbons. This helps cover the wreath frame and keeps everything looking full. The curls add color and texture, while the ruffles create the main body of the wreath.
7. Complete the Top Row
Once the bottom row is finished, move to the top row. For the top, use the 20-inch ruffles and ribbon tails only. Skip the curls on the top row because the space is smaller, and too much mesh can make it difficult to add your sign and bow.
Add each ruffle directly into the top ties, then place the ribbon tails on top. Spread the ribbons and pull the mesh upward to keep the wreath full.
If the wreath starts to look too dark because of the black ribbon, layer the colorful ribbon on top of the black ribbon instead of spreading them far apart. This brings the purple, orange, and green forward and softens the black.
8. Attach the Witch Cat Sign
Use a metal hole punch to punch one hole at the top of the sign and one hole at the bottom. Cut pieces of 26-gauge wire about 20 inches long.
Thread the wire through each hole, double it up, and twist it close to the sign so it does not move. Use a plastic weaving needle to pull the wire down through the mesh and around the wreath frame. Mesh already has holes in it, so the weaving needle makes attaching signs much easier.
Before tightening the second wire completely, adjust the sign so it sits where you want it. Once it is placed correctly, tie it tightly around the frame and tuck in the wire ends.
9. Make the Bow
For the bow, start with black ribbon and make about a 12-inch tail. Since black is a dark color, use just one loop so it does not overpower the wreath.
Add a patterned Halloween ribbon next. If the ribbon has a directional pattern, make the loop first, then pick up the whole loop and twist it so the design faces the right direction. This keeps both sides of the bow looking correct.
Add a green and orange reversible ribbon as the next layer. Make this loop slightly smaller, around 5 inches, so you can see the ribbon behind it. Reversible ribbon is fun because you can flip it over and show both sides in the same bow.
10. Secure and Fluff the Bow
Run a zip tie under all the ribbon in the bow maker and get it started. Pull the bow out and make sure the zip tie stays in the indentation from the bow maker. This keeps the loops exactly where you placed them.
Fluff the bow by twisting each loop and pulling the ribbon open. If pieces are stuck in the center, twisting helps loosen them so the bow becomes nice and full.
Attach the bow to the wreath wherever it looks best. The bottom is a great option because it balances the sign and adds a finished touch.
11. Final Fluffing
Hold the wreath up and look at it from the front. Adjust the ribbons, pull out the ruffles, and make sure the sign and bow are straight. This wreath should look full, colorful, and spooky cute.
This Halloween Witch Cat Deco Mesh Wreath is a fun way to use bright Halloween colors, experiment with ruffles and curls, and create a cute seasonal wreath that cat lovers will absolutely adore.
Ready to Make Your Own Witch Cat Wreath?
If you love fun and whimsical Halloween decor, I hope this DIY Spooky Cute Halloween Witch Cat Deco Mesh Wreath With Ruffles and Curls inspires you to make one of your own! The mix of deco mesh, ruffles, curls, ribbon, and that adorable witch cat sign makes this such a playful statement piece for your front door.
Want to make this wreath yourself? You can purchase the Halloween Witch Cat Sign from RCL Signs and More using the link in the supply list above. Once you have your sign, gather your favorite Halloween mesh and ribbons and put your own creative spin on the design.
Be sure to follow along with the full tutorial so you can see exactly how I layer the ruffles and curls and bring the whole wreath together.
If you make one, I’d love to hear about it! Leave me a comment and tell me what colors you would use for your Witch Cat Wreath.