

Beginner-Friendly Turkey Wreath with Woodland Ruffles and Curls
Beginner-Friendly Turkey Wreath with Woodland Ruffles and Curls
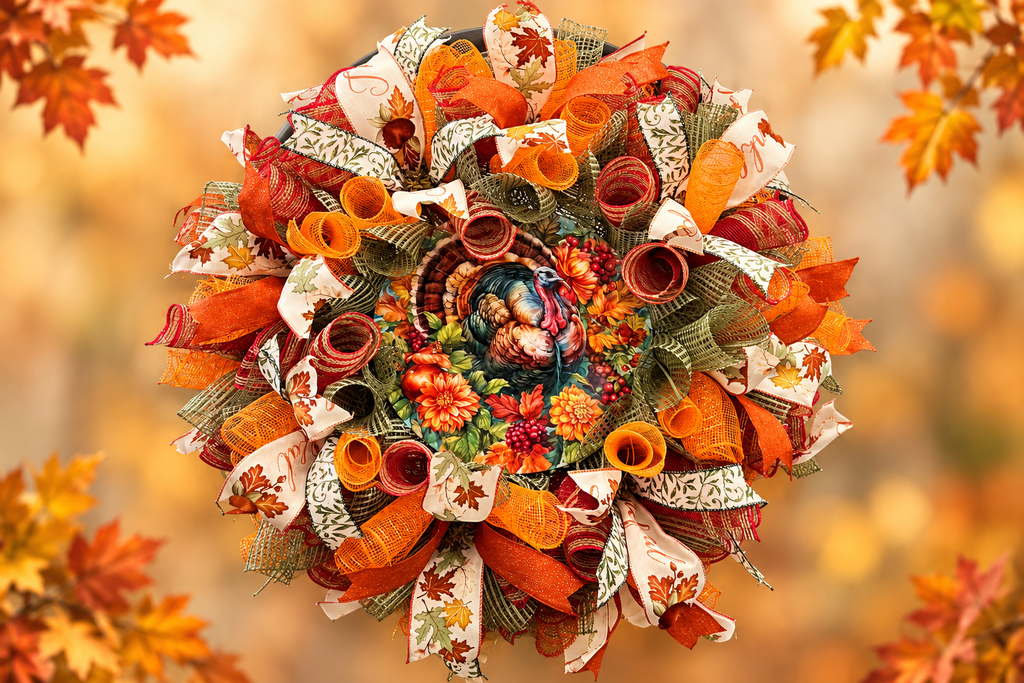
If you are looking for a festive fall wreath that can stay on your front door all the way through Thanksgiving, this Beginner-Friendly Turkey Wreath with Woodland Ruffles and Curls is such a fun project to make. It has beautiful autumn colors, a cute turkey sign, full deco mesh, and coordinating ribbons that pull everything together perfectly.
This wreath is designed with traditional fall colors like green, orange, burgundy, tan, mustard, and gold. The turkey sign gives it that Thanksgiving feel, while the mesh and ribbons make it full enough to use for the entire harvest season. I chose this design because it can stay up until right after Thanksgiving, making it a great transition wreath from fall into the holiday season.
The technique is beginner friendly because it uses simple ruffles, curls, ribbon tails, and an easy sign attachment method. You can make it as full as you want, and if you are new to deco mesh wreaths, this is a great project to practice on.
Supply List
Tan work wreath base
Turkey sign
Green wide horizontal mesh
Orange mesh
Burgundy mesh with tan stripe
Fall ribbon with “thankful” wording
Orange glitter ribbon
Leaf ribbon
Gold-accent leaf ribbon
26-gauge wire
Pipe cleaners
Zip ties
Metal hole punch
Plastic weaving needle
Bow maker
Scissors or rotary cutter
Wire cutters
Step-by-Step Instructions
1. Prepare Your Wreath Base
Start with a tan work wreath base. Open all the ties so they are ready before you begin adding mesh. I like to work on the bottom row first and then move to the top row, but you can do it either way.
Push the top ties toward the center while you work on the bottom row. This keeps them out of the way and makes it easier to see where you are placing each ruffle and curl.
2. Cut Your Mesh and Ribbon
For this wreath, cut the green wide horizontal mesh at 20 inches. Cut the orange mesh and burgundy mesh at 10 inches. Cut all ribbon tails at 12 inches.
The green mesh will be used for the woodland ruffle base, while the orange and burgundy pieces become curls. I alternated the curls by using two orange and one burgundy, then switching to two burgundy and one orange, so the colors stayed balanced around the wreath.
3. Make the Woodland Ruffle
Take one 20-inch piece of green mesh. If you are using the last piece on the roll and it has a little bend, do not worry. Use it anyway because once everything is added to the wreath, you will not notice it.
Curl each end of the mesh under just a little, then gather straight down the middle. For this wreath, the woodland ruffle has more ruffle than curl, so you only need a small curl on each end. This gives you a soft, full look without making the curl too tight.
4. Add the Mesh Curls
Next, add three 10-inch curls on top of the ruffle. Use two pieces of one color and one piece of the other color. For the next section, switch the combination.
For example, start with two orange curls and one burgundy curl. On the next tie, use two burgundy curls and one orange curl. This spreads the colors around the wreath so one color does not dominate.
Place the curls on top of the green ruffle, then hold everything together.
5. Add Ribbon Tails
Take a set of 12-inch ribbon tails and fold them in half to find the center. Pinch the center, then run your hands under the wired edges. This gives the ribbon a nice shape and helps it stand up instead of laying flat.
Place the ribbon tails on top of the mesh ruffle and curls, then secure everything into the wreath tie. Spread the ribbons apart so each pattern can be seen.
6. Continue Around the Bottom Row
Repeat the process around the entire bottom row: one green woodland ruffle, three mesh curls, and one set of ribbon tails.
As you go, pull the mesh up and spread the ribbons so the wreath stays full. I like a full wreath, and using the ruffle with curls helps cover the frame beautifully. The combination of green, orange, burgundy, and tan gives the wreath a rich harvest look.
7. Complete the Top Row
Once the bottom row is finished, open the top ties and repeat the same process. Sometimes you can leave the curls off the top row if you want to use less mesh, but for this design, the curls are added to both the top and bottom rows for extra fullness.
On the top row, spread the ribbons out well because they will be easier to see. Continue alternating the orange and burgundy curls so the colors stay balanced.
8. Attach the Turkey Sign
Once the mesh and ribbon are finished, it is time to attach the turkey sign. Use a metal hole punch to punch one hole at the top and one hole at the bottom of the sign. You can also place the holes side to side if that works better for your design.
Cut about 22 inches of 26-gauge wire for each hole. Thread the wire through the hole, double it up, and twist it where it meets the sign. I prefer silver wire because it hides easily inside the wreath.
Use a plastic weaving needle to pull the wire down through the mesh and around the wreath frame. Tie the wire securely around the frame, then tuck the ends in so they do not poke out. You can purchase a Plastic Weaving Needle from RCL Signs and More and link will be in the supply list.
9. Adjust the Sign and Ribbons
Before tightening everything completely, make sure the sign is placed where you want it. Push the mesh up slightly around the sign so it nestles into the wreath.
Once the sign is secure, adjust the ribbons around it. Wired ribbon makes this much easier because you can shape it and make it stand up nicely.
10. Make the Matching Bow
Use the same ribbons from the wreath to make a matching bow. Start by dovetailing the first ribbon, then make an 8-inch tail and 6-inch loops.
Layer in the other ribbons, using two loops or one loop depending on how full you want the bow. If you use a ribbon with words, such as “thankful,” make your loop first, then pick up the loop and flip it over so the words face the right direction.
Secure the bow with a zip tie and add a pipe cleaner to the back.
11. Fluff the Bow
Fluff the bow by twisting each loop back and forth to loosen the ribbon from the tight center. Pull out any pieces that are stuck down in the zip tie so the bow becomes full and fluffy.
Run your hands under the tails, then curl the longer tails loosely around your thumbs if you want a softer look.
12. Finish Your Wreath
You can attach the bow directly to the wreath, place it at the bottom, or save it for a matching mailbox bow. I like to use matching bows on my mailbox so the front door and mailbox coordinate.
Once everything is fluffed and adjusted, your Beginner-Friendly Turkey Wreath is ready to display. It is full, festive, and perfect for fall, Thanksgiving, and the entire harvest season.
Now that this Beginner-Friendly Turkey Wreath is finished, I have to ask, are you ready to make one for your own front door?
This is such a fun wreath to create because it can stay up all season long, from early fall all the way through Thanksgiving. The turkey sign, warm fall colors, woodland ruffles, curls, and pretty ribbons all come together to make a full, festive wreath that looks beautiful on a front door, porch, or even as part of your Thanksgiving decor.
If you want to make this wreath even easier, be sure to check out my coordinating Sign and Ribbon Set. The best part about using a set is that so much of the work is already done for you. You do not have to spend time searching for ribbons that match the sign, comparing colors, or buying several separate rolls just to get the right look.
I have already matched the sign with beautiful, coordinating ribbons so you can start creating with confidence. My ribbon is the highest quality, and it makes such a difference in how your wreath turns out. Good ribbon holds its shape, fluffs beautifully, and gives your wreath that full, finished, professional look.
So if you are ready to make your own adorable turkey wreath, grab the Sign and Ribbon Set, gather your mesh, and let’s get crafting. I cannot wait to see what you create!