
How to Make a Halloween Ruffle Deco Mesh Wreath
How to Make a Halloween Ruffle Deco Mesh Wreath with a Unique in the Creek Character Board
Get ready to add some spooktacular flair to your door this Halloween! In this DIY guide, we’ll walk you through creating a festive and fun Halloween wreath using a Unique in the Creek (UITC) character board, a ruffle mesh technique, and eyeball-themed accents that are more on the cute side and less on the creepy side. Whether you’re a seasoned crafter or just dipping your toes into wreath-making, this project is full of tips and creative ideas to inspire you!
Supplies You’ll Need:
- UITC character board (or any flat wreath base)
- Pipe cleaners (16 total)
- Deco mesh (green, purple, orange, black – cut at 30 inches)
- Halloween-themed ribbons (eyeball print, spiderweb, etc.)
- Halloween sign (eyeball/web theme shown)
- 2 Styrofoam discs (Dollar Tree)
- 26-gauge floral wire
- Scissors & rotary cutter
- Hole punch
- Optional: DIY eyeball picks using glitter foam balls, craft paint, puffy paint, and sponge brushes
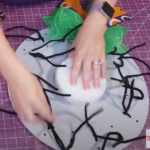
Step 1: Prep the UITC Board with Pipe Cleaners
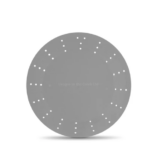
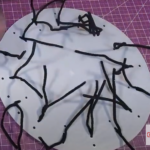
Start by prepping your board. The UITC character board has three sets of holes all around. Alternate your pipe cleaner placements by doing one in the first two holes and the next in the second and third holes, creating two defined rows. This method gives the wreath a fuller, layered look. You’ll want 16 pipe cleaners in total.
Step 2: Cut and Curl Your Deco Mesh
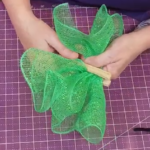
Using 10” or 21” wide mesh, cut each strip to 30 inches. Choose fun Halloween colors like green, purple, black, or orange. Metallic mesh works especially well for that extra sparkle.
Make sure the mesh is placed “right side up”—this helps it curl outward and gives a cleaner look. Tuck under the edges slightly to avoid fraying. Then, ruffle by scrunching straight up the center. A deco mesh ruffle tool makes this step easier, especially if you have hand pain.
Step 3: Attach Ruffles to the Board
Attach each ruffle by twisting it into the pipe cleaners. Fluff the mesh as you go to ensure fullness. Work around the entire outer ring first before adding ruffles to the inner ring.
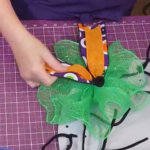
Step 4: Add Ribbon Tails
Cut your ribbon strips (approximately 12–14 inches long) and pinch each one in the center. Add them on top of each mesh ruffle using the same pipe cleaner tie. Then, twist the pipe cleaner again to secure. Fan out your ribbon tails for dimension.
Use contrasting ribbons, like orange eyeballs paired with green spiderwebs, to make your wreath pop!
Step 5: Mount the Sign
Before the wreath gets too full, attach your sign. Use a hole punch to create holes at the top, bottom, and optionally the sides of the sign. Thread floral wire through the holes.
Place two Dollar Tree foam discs under the sign to give it lift. Then, use your wires to secure the sign to the board, threading them through the board holes and twisting them tight from the back. No glue needed!
Step 6: DIY Eyeball Accents
Want to make your own spooky eyeballs? Grab some glitter foam balls from the craft store or Dollar Tree. Use sponge brushes to dab bright acrylic paint (green, orange, or purple) on the surface. Then add a black puffy paint dot in the center for the pupil. Finish with a tiny white dot (use a Cricut weeding tool or Q-tip for precision) to bring your eyeball to life.
Let them dry in a small tray or plastic container so they don’t roll away.
Once dry, glue or twist them onto your wreath with floral wire or hot glue.
Step 7: Fluff and Final Touches
Once your ribbons and sign are secure, finish adding your inner ring of ruffles and ribbon. Be sure to fluff and reposition as needed. The wreath will be very full, and that’s exactly what we want!
If your sign is getting a bit lost, just add more foam underneath to lift it even higher. Add extra eyeballs where you like, there’s no wrong place for a little Halloween whimsy.
Bonus Tip: Bow Option
Want to add a bow? Use the holes on the back of the board (where your hanger will go) to secure a bow right above the sign. It’s a great way to finish off the top!
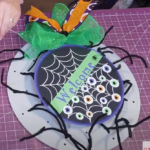
Why We Love It
This wreath strikes the perfect balance between cute and creepy. The color scheme is vibrant and fun, not too scary, and the eyeball accents are an adorable nod to Halloween without going full horror movie. Plus, using pipe cleaners instead of zip ties makes it easier to secure mesh and ribbon with less hand strain.
Whether you’re decorating for trick-or-treaters or just bringing Halloween cheer to your front door, this wreath is sure to be a conversation starter.
Shop the Look
The sign and ribbon set featured in this project are available from RCL Signs and More. Perfectly coordinated and bursting with Halloween charm!
