
How To Make A Vintage Valentines Ruffle Wreath
Affiliate links for tools used. If you purchase I will get a few pennies for the purchase. About enough to buy a stick of gum 🙂
I hope you are ready for Christmas I know I am not. I celebrated my birthday this week, I want to thank all that emailed me and sent sweet messages it means a lot to me.
If you read last week’s post we are moving on to the next season, Valentine & Mardi Gras. I wanted to show you my new signs that are in my shop so I figured what better way than to make a wreath with it. Today we are going to be using two different colors mesh both are 10-yard rolls cut into 30″ inch strips.


We are using a red snowball mesh and then a natural snowball mesh. I love this mesh works great for most seasons. So you will need 9 of each color, and we are using a 15″ work wreath frame. I also have 4 ribbon choices for this project and I cut them all at 12-inches using my perfect tails.


I will start but prepping my frame opening all the ties all the way around. Then I will be alternating the mesh colors creating a ruffle. When creating a ruffle you will have your thumbs on the end of the mesh and you will spider crawl your hands up keeping it in the center of the mesh, creating your bowtie ( ruffle).


Then I will place this directly into the tie twisting it closed a couple of times. We will do this around the whole wreath making sure after you place that you are fanning out the ruffle and making the edges fluffed together this is a great way to hide the wreath frame and its inner workings.


I love how this is looking! Again with the ruffle will lay my mesh flat and taking my thumbs at the end of the mesh and pushing the mesh with your fingertips straight up the middle creating that bowtie shape.
Adding my ribbons I will take them and fold it in half to create the center and then get a good punch in the center then taking the ends between my fingers and pulling up, you will get a nice bird-like figure with the ribbon tails.


We will add these around the wreath frame alternating the patterns. I like to lay my ribbons out how I want them to go on the wreath ahead of time it really saves me time and patterns coordinate. When placing my ribbon I will alternate what ones are laying on the top of the wreath and which are on the bottom. Tie it on, and then tuck those ties under.


After we have placed our ribbons and mesh we will move on to our sign and placing it on the wreath. I will use my metal hole punch and punch out the four corners of the sign. I will take my 26 gauge wire about 15inch or so long, I like to use the wire because you can’t really see it well and so it hides. I will run the wire through the holes of the sign and twist it around the sign.


After the wire is attached to the sign we will run the wire through and attach it to the wreath frame. You can always run it through the mesh if you need too. If you want your sign to stick out a bit with some depth make sure you add it on top of your ruffles.
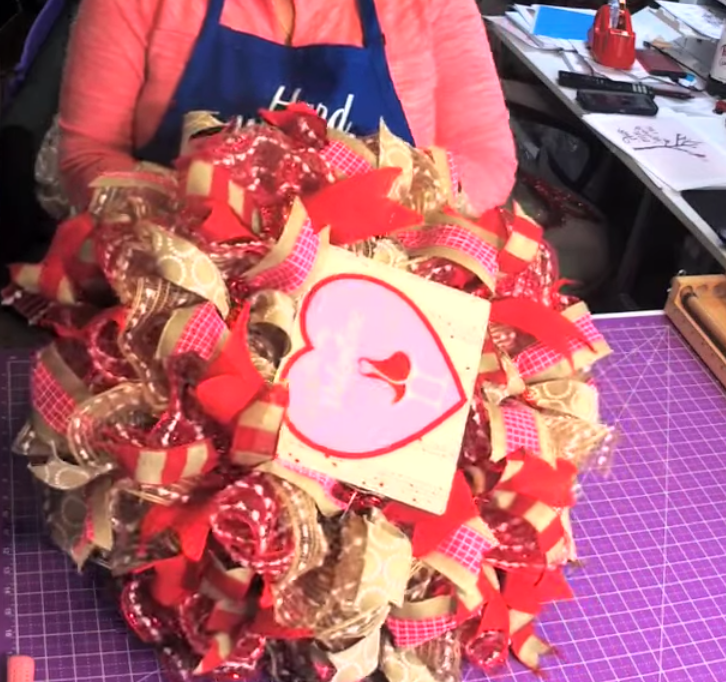
Here you have it the sweetest vintage valentines wreath with cute wine sign. Check out my other wreath signs at http://hardworkingmomstore.com.
We will catch you next week! Happy Holidays.
Supply List:
Shop- https://hardworkingmomstore.com/
Business Group- https://hardworkingmom.com/success-path/
Wreath design group- https://hardworkingmom.com/product/de… Website- https://hardworkingmomstore.com/
Tools & Supplies Store-https://www.amazon.com/shop/influence… METHOD: Ruffle Method
Supplies Trendy Tree- https://bit.ly/350JHZO
Deco Exchange https://goo.gl/QPsTPY
Mesh cut – 30 inches
10 yards Red snowball drift mesh
10 yards Natural snowball drift mesh
Ruffles Ribbons cut -12 inches
1.5 inch- Red and Natural stripe ribbon
1.5 inch- Natural ribbon with white swirls
2.5 inch- Solid Red ribbon
2.5 inch- Gold sided with pink center ribbon
Valentines Sign- hardworkingmomstore.com
Mesh Roller https://www.simplify-organize.com/pro…
Probow the hand http://amzn.to/2zbz4Yp
Fiskars Rotary cutter and mat http://amzn.to/2hyAUHL
Ryobi Glue gun http://amzn.to/2hBoizL
Bowdabra bow maker http://amzn.to/2zdPxeE
Metal Hole Punch http://amzn.to/2Ao
Affiliate links for tools used. If you purchase I will get a few pennies for the purchase. About enough to buy a stick of gum 🙂

https://hardworkingmom-school.thinkific.com/courses/youtube-success-in-six
Need Help?
If you are interested in learning more about our Success Path group, you are welcome to do so following this link: https://hardworkingmom.com/success-path
Want to learn Wreath Designing? Here is my Coaching Group, follow the link here: https://hardworkingmom.com/product/design-with-hard-working-mom-wreath-therapy-on-steroids/
Need a bundle, here is the link to save on both groups: https://hardworkingmom.com/product/design-with-hard-working-mom-wreath-therapy-on-steroids-combined-with-lori-jacobs-success-path/
Find Me Here
Email me: [email protected]
YouTube: @https://www.youtube.com/hardworkingmom
Instagram: @hardworkinglori
Twitter: @hardworkingmomtv
Facebook: @hardworkingmomtv
My Etsy Shop: DesignedByHWM
Hardworkingmom Store: https://hardworkingmomstore.com/
Amazon Influencer: https://www.amazon.com/shop/influencer-5ef69f14