
How to Make a Dog Wreath for Christmas
This video tutorial will show you how to make a Dog Wreath for Christmas using the Woodland Ruffle Method.
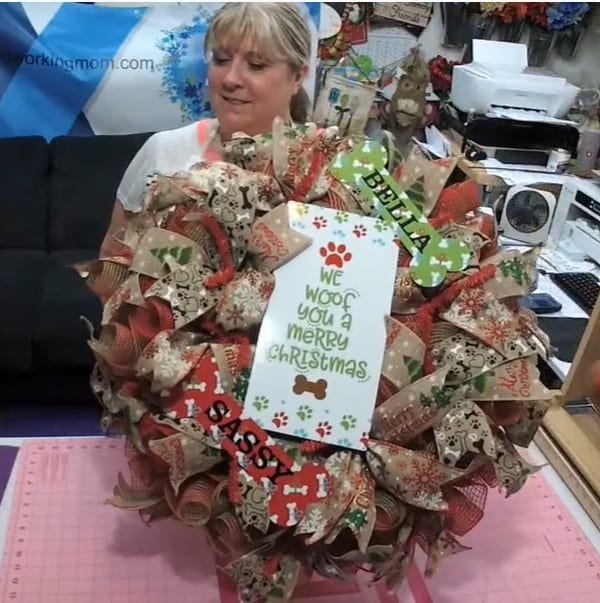
Learn how to attach a metal sign and personalized dog bones! I have this sweet sign, “We Woof You a Merry Christmas” and two dog bones with “Bella” and “Sassy” written on them (my pups)! We’ll use a red base, cute sign, and fabric mesh for this project.
Step-by-step written instructions are listed below with helpful links and video timestamps.
Disclaimer: this post contains affiliate links for supplies and tools used. If you purchase, I will get a few pennies for the purchase. About enough to buy a stick of gum 🙂
Method: Woodland Ruffle / 34-Inch Ruffle
Ribbons: cut at 12 inches
Mesh: cut at 34 inches
Supplies are as follows:
- 5″ Red Pencil Work Wreath, https://goo.gl/QPsTPY
- Dog Christmas Sign, https://www.etsy.com/listing/7037188…
- (2) 10″ Red, Green, and Tan Fabric Deco Mesh, https://goo.gl/QPsTPY
- Optional: Personalized Metal Dog Bone(s), https://www.etsy.com/listing/7037188…
- Metal Hole Punch
- Silver Wire for Attaching the Sign
Ribbons:
- 2.5″ Merry Christmas Tree Ribbon, https://goo.gl/QPsTPY
- 2.5″ Tan with Red Snowflake Ribbon, https://goo.gl/QPsTPY
- 2.5″ Christmas Tree Merry Christmas Ribbon, https://goo.gl/QPsTPY
- 2.5″ Dog Bone Ribbon, https://goo.gl/QPsTPY
Tools (Optional):
- Mesh Roller https://www.simplify-organize.com/pro…
- Probow the hand http://amzn.to/2zbz4Yp
- Fiskars Rotary cutter and mat http://amzn.to/2hyAUHL
- Ryobi Glue gun http://amzn.to/2hBoizL
- Bowdabra bow maker http://amzn.to/2zdPxeE
- Metal Hole Punch http://amzn.to/2Ao
How to Make a 34″ Woodland Ruffle Dog Christmas Wreath
Written Instructions with Video Timestamps:
Getting Started
Prep the Fabric Deco Mesh: I cut the mesh for this project at 34 inches. I try not to go any shorter as it doesn’t ruffle up as well. I just place my mesh roll on my mesh roller, roll out a section over my cutting mat, measure at 34 inches and cut with my rotary blade [1:40]! Easy peasy! I use two rolls of fabric mesh for this dog wreath project using the woodland ruffle method. You’ll need about 18 pieces for the 15″ pencil work frame as it has 18 ties total (10 on outer layer, 8 on inside layer).
Prep the ribbons: I precut my ribbons for the project at 12 inch lengths with dovetails. The ribbons will be tied to each twist tie on the work frame. You will want at least 9 pieces of each type of ribbon. Set aside.
Prep the Frame: using a 15” Red Pencil Work Wreath, open up your ties. This will make the poof making go faster. A work frame comes with twist ties already attached to the wreath. No need for pipe cleaners.
Creating your Woodland Ruffles
With fabric mesh, it’s much easier to ruffle! However, it tends to fray at the cut ends. For this reason, we’ll curl the ends of each strip and ruffle them together.
I’ll try to explain it. What we’ll do is take one end (secure the other with a paper weight or heavy-enough object), and roll the end into three curls and clip to hold.
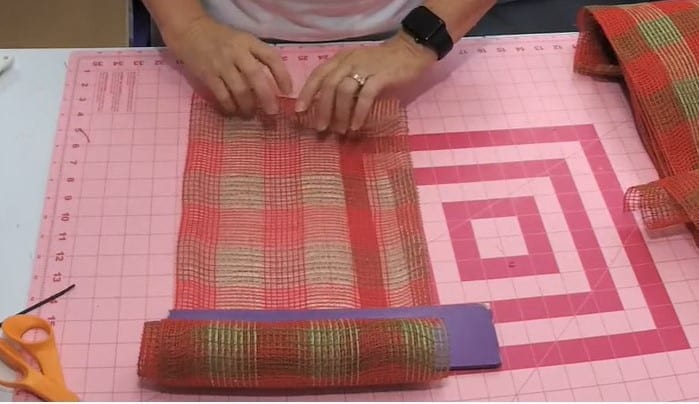
Now take the other end and do the same, except after you create 3 curls, ruffle up the middle section until the two curls meet [2:45]!
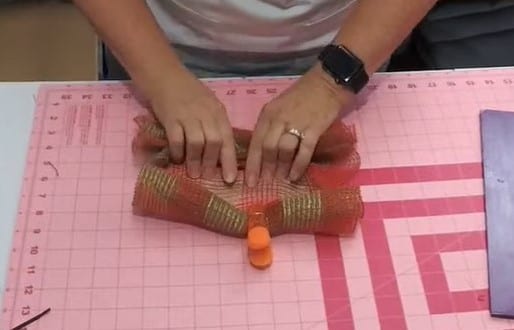
Pinch the center and you’ve created a nice soft woodland ruffle! Attach the curl/ruffle combo to a tie on the wreath frame starting on the outside edge.
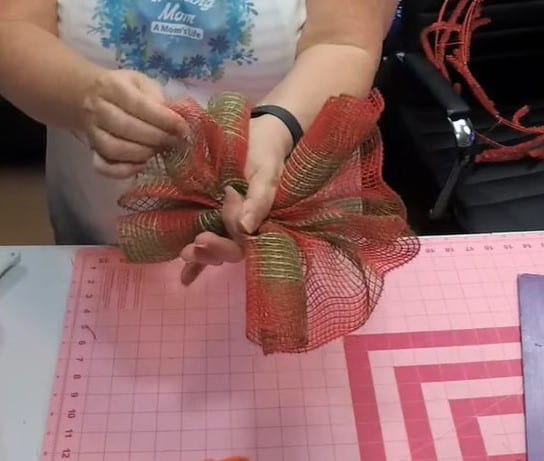
I like to start on the outside, working my way around the wreath, and then fill the inside edge last. Repeat this process for each one of the ties on the wreath frame. You should have about 18 ties for the 15″ pencil work wreath (10 on the outside, 8 on the inside). See an example of how it should look below:
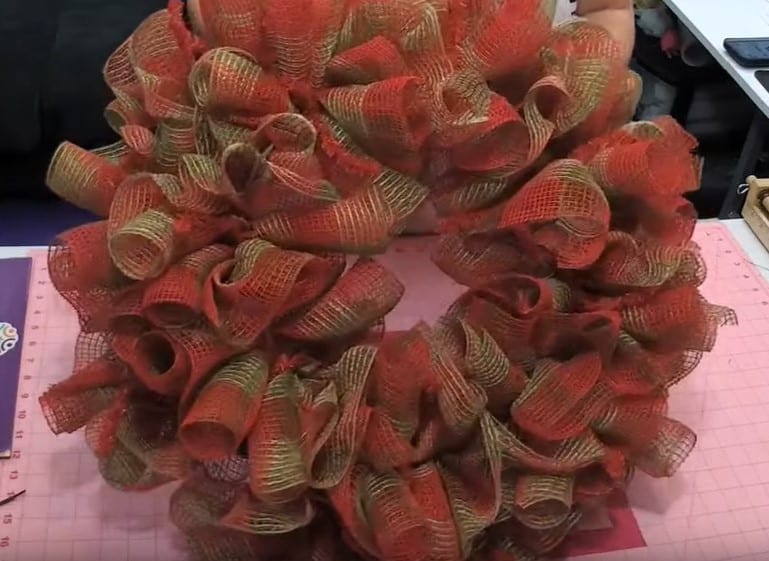
The fabric mesh makes for a nice and soft woodland ruffle, don’t you think? It’s a nicer, thicker material. For this reason, it tends to be a little more expensive, but you should be able to find it anywhere. I like to buy mine when they go on sale. Hobby Lobby sometimes comes out with Christmas fabric mesh. Fabric mesh is water proof and tends to be softer. The ends fray, but it ruffles so very nicely!
Adding the Ribbons
Adding the ribbons is easy if you have them precut and ready to go. Precut your ribbons into 12 inch pieces, dovetailing the ends.
Choose two different ribbon pattern pieces to stack. Pinch the center of the stack, creating a bow, and tie onto the wreath [18:57]. Once secure, stretch and move your ribbons until they lay well. Next, do the same for the other two ribbon pieces: stack, pinch, and tie onto the wreath. Work your way around the wreath for each of the ties on the frame.
Attaching the Doggy Sign and Bones
For this project, I have a cute metal sign from Personalize It By Pam available on Etsy, plus two bonus personalized dog bones for my sweet pups! You’ll see how this particular sign stands out so well from the wreath we made because we used neutral colors with the fabric mesh and ribbons.
This sign doesn’t come with holes, so you’ll need a metal hole punch. Punch a hole in each of the four corners on your sign. Using thin silver wire, cut four long pieces (think pipe cleaner length, or double that – easier to pass through the layers of mesh/ribbon and tie to frame). These four pieces of wire will be our ties for our dog sign. Loop the metal wire through each of the corner holes [30:44].
Next, carefully position the sign on your wreath. I chose the center of the wreath. Thread the wires through the ribbon and mesh to the back of the frame. You don’t want to poke through the ribbon or mesh, so try to work the wire around them. Secure to the frame…twisting, and then wrapping it around the frame to secure well. You can clip the excess wire if needed.
If you have other metal signs such as the personalized dog bones, repeat the steps above with the hole punch and wire to secure to frame.
That’s it! This project is quick and easy AND BEAUTIFUL! Don’t you love the look of the fabric mesh woodland ruffles?
View the final wreath in the video at timestamp [33:23].
I hope you enjoyed this tutorial!
For more Christmas and Winter Project Ideas and Tutorials, check out my YouTube Playlist: Winter Wreaths and Crafts
Bonus News: I now have a channel on Roku! Check out Hard Working Mom on your Roku streaming tv. If you have a Roku, please check it out and tell me what you think!!!
I hope this post has inspired you to include your fur baby (or babies) in your next project! If you do, please share with me! I’d love to hear from you and see what you’re making. My social links are posted below.
Bye Ya’ll,
❤ Lori
Other Posts You May Like:
Need Help?
If you are interested in learning more about our Success Path group, you are welcome to do so following this link: https://hardworkingmom.com/success-path
Want to learn Wreath Designing? Here is my Coaching Group, follow the link here: https://hardworkingmom.com/product/design-with-hard-working-mom-wreath-therapy-on-steroids/
Need a bundle, here is the link to save on both groups: https://hardworkingmom.com/product/design-with-hard-working-mom-wreath-therapy-on-steroids-combined-with-lori-jacobs-success-path/
Find Me Here
Email me: [email protected]
YouTube: @https://www.youtube.com/hardworkingmom
Instagram: @hardworkinglori
Twitter: @hardworkingmomtv
Facebook: @hardworkingmomtv
My Etsy Shop: DesignedByHWM
Hardworkingmom Store: https://hardworkingmomstore.com/
Amazon Influencer: https://www.amazon.com/shop/influencer-5ef69f14