How To Make a Poof Curl St. Patrick’s Day Wreath
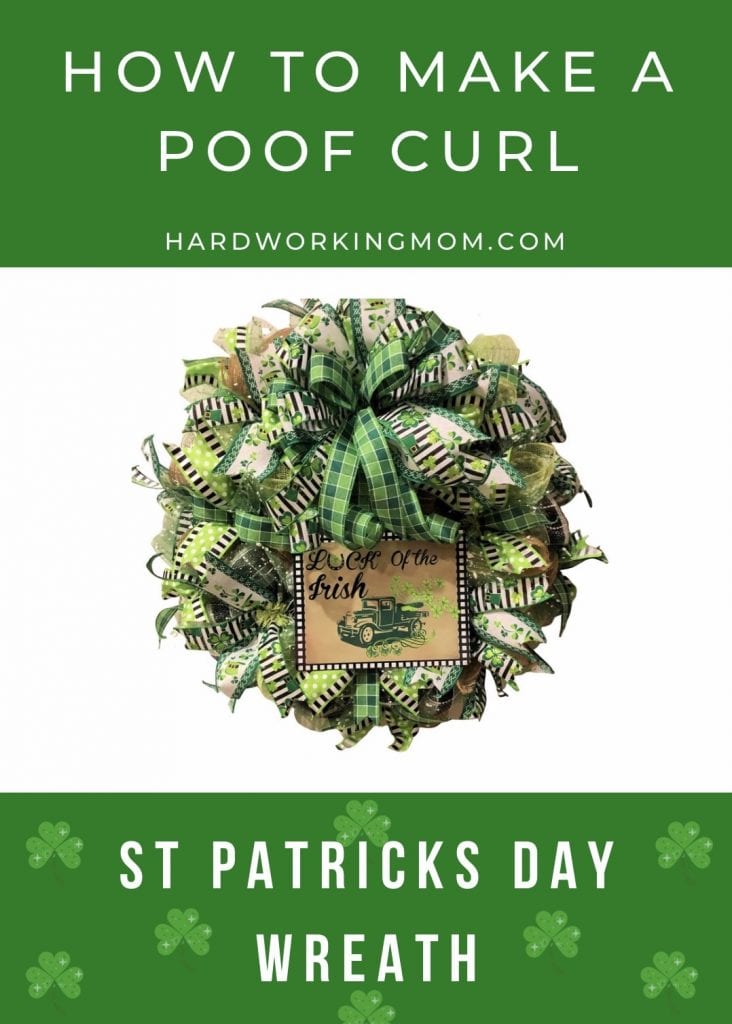
Happy March Everyone! Now that Valentine’s Day has come and gone, it’s time to brighten up our front door with some fresh new spring décor. Starting with St. Patrick’s Day, which is only a few weeks away, let’s make this lovely Irish Wreath to decorate our front door and welcome friends, family and guests and bring the “Luck of the Irish” to all who enter our front door! In today’s video I will teach you the steps on how to make your own St. Patrick’s Day wreath using the poof curl method.
This post may contain affiliate links for your convenience. Click here to read my full disclosure policy.
Method:
I’m using the Poof and Curl technique to create this deco mesh wreath and cutting the deco mesh at 15” inches and the ribbons at 12” inches. This wreath is perfect for your front door, will look great over the mantle, and will look lovely as a part of your home’s interior décor.
Are You Ready? Let’s Get Started!
Supplies Needed for Your St. Patrick’s Day Wreath
21” Black & White Checked Deco Mesh
1.5” Black & White Stripe with Hat Ribbon
2.5” Green & White St. Patrick’s Day Hat Ribbon
2.5” Green Piano Tile Edge & White Polka Dot Ribbon
You can shop for the supplies used to make this wreath with two of my favorite online floral suppliers Trendy Tree and Deco Exchange. I use these shops quite often and highly recommend them!
You May Also Need:
Designer Wreath Tools Most Often Used in My Projects:
Steps for Making the St. Patrick’s Day Poof Curl Wreath
Follow the steps below along with the video to make your very own St. Patrick’s Day Poof Curl Wreath.
Poof Curl Instruction
Step 1: First you will need to cut your deco mesh to make the curls. In this tutorial, I use three different deco mesh patterns from 21” inch deco mesh rolls. Cut 8 – 15” inch pieces from each roll, then cut two additional 15” pieces (your choice of pattern), for a total of 26 – 15” inch deco mesh pieces.
Step 2: Next, using your 15” Work Wreath Form (the one used here is Lime Green) open all the ties on the bottom rung of the work wreath. Begin making your first curl by rolling the 15” inch deco mesh piece into a curl. Using this first curl, measure 3” inches of one end of the curl and place it in your first bottom rung open tie and twist to secure, move to the next open tie and again measure 3” inches at the other end of the curl and insert into the next open tie, at this point, you can lightly fluff the poof. Move on to adding the second curl, using the same method above, but insert the second curl end on top of the existing curl tie, so here you will have two curls in each tie as you move around the work wreath. (Take a look at the video for details).
Step 3: Moving on to the top rung of the work wreath, in this video I use two layers of curls. Make sure to push the second poof curl toward the middle, this will give it three full distinct poof layers. You can totally stop here and move on the ribbon steps below or you can add a little sparkle to your design using an “add in” of splatter mesh.
Add In: To use the splatter mesh in your design, you will need to cut 9 – 10” inch pieces of splatter mesh, then cut those 9 pieces in half. You’ll add this in along with your ribbon tails, noted in Step 4.
Designer Note: Based on the quality and thickness of your deco mesh you may need two layers on the top rung only, if using a lesser quality mesh, so you would end up with 4 curls in each tie on the top rung. If you use a better-quality mesh you should not have to use two layers of curls on the top rung, therefore you would only have two curls per tie on the top rung.
Ribbons, Sign, Splatter Mesh and Bow:
Step 4: Cut your ribbon tails into 12” inch strips for a total of 18 – 12” ribbon tails for each ribbon you plan to use. In this tutorial, I use a total of 4 different ribbons. Place your ribbon tails and splatter mesh together and insert them into the wreath form filling all 18 ties.
Step 5: Next, add your sign. In this tutorial we are using a sign from my shop you can find signs to purchase in my Hard Working Mom Store. Using the metal hole punch place a hole into each corner of the metal sign. Cut 4 – 20” inches pieces of 26 gauge silver floral wire and run each piece thru the 4 holes. Attach the sign in your preferred location, then move on to making the bow.
Step 6: To make your bow in this wreath tutorial, I use a combination of the ribbons used in the wreath base. You can watch the video to see detailed instructions on how to make the bow and how to attach it to your wreath. Be sure to watch to the end of the video, I show you the method on how to fold your patterned ribbons so that the pattern lands in the proper direction.
That’s it! You Made Your Very Own St. Paddy’s Day Wreath!
Designer Tip: Using leftover deco mesh rolls is a great way to get the most of your supplies! Always, remember to trim all the excess wires and hide all the mechanics giving your wreath a professional designer finish and make sure to shake your finished wreath checking that everything is good and secure.
How To Make A Poof Curl St. Patrick’s Day Wreath Video
If you have enjoyed this and want to learn more about creating designer wreaths and more, join me in our Wreath Therapy Design Group.
And, if you’re ready to start and grow your own crafty entrepreneur business, join me in my Success Path Business Group.
You can always find me designing more wreaths like this one Live on YouTube at Hard Working Mom YouTube Channel.
If you’re new to wreath making and not sure where to find the tools and supplies you need to get started, You can easily find my Tools & Supplies Shop here.
As always, I hope you enjoy today’s Wreath Therapy!
Lori